Front Post and Back Post Double Crochet (FPdc & BPdc) Ribbing
Work around the post to push stitches forward or back, for stretchy ribbing, cables and the waffle stitch.

11 min read

Stitch at a glance
- US terms
- Front post double crochet
FPdc / BPdc - UK terms
- Front post treble crochet
FPtr / BPtr
Front Post Double Crochet (FPdc) and Back Post Double Crochet (BPdc) are textured variations of standard double crochet (dc) where you insert your hook around the vertical post (stem) of the stitch in the row below rather than under the two top V-loops. Wrapping the stitch around the post from front to back to front (FPdc) pushes that column forward toward you as a raised vertical cable, while inserting the hook from back to front to back (BPdc) pulls the column away from you into a recessed groove. Alternating FPdc and BPdc across a row creates plush, vertically oriented post-stitch ribbing, reversible basketweave blocks, and deep thermal waffle grids.
US vs. UK Terminology Note: This guide uses standard US crochet terms. In UK crochet patterns, Front Post Double Crochet (FPdc) is called Raised Treble Front (RtrF) or Front Post Treble (FPtr), and Back Post Double Crochet (BPdc) is called Raised Treble Back (RtrB) or Back Post Treble (BPtr). See our US vs. UK crochet terms guide for full stitch conversions.
Quick Reference: Front & Back Post Double Crochet (FPdc & BPdc)
Feature | Front Post Double Crochet ( | Back Post Double Crochet ( |
|---|---|---|
US Abbreviations |
|
|
UK Equivalent |
|
|
Chart Symbol | Standard | Standard |
Hook Insertion Path | Front → Back → Front around the vertical stem | Back → Front → Back around the vertical stem |
Surface Effect (Facing You) | Pushes the vertical column forward (raised ridge) | Pushes the vertical column backward (recessed valley; leaves a horizontal bar of skipped top loops on the front) |
Recommended Turning Chain | 2 chains ( | 2 chains ( |
Typical Yarn Usage vs. Standard DC | Uses noticeably more yarn (often estimated at roughly 20%–35% more yarn per square foot, estimate) because shortened row height requires more rows per inch | Same higher yarn density due to vertical compression |
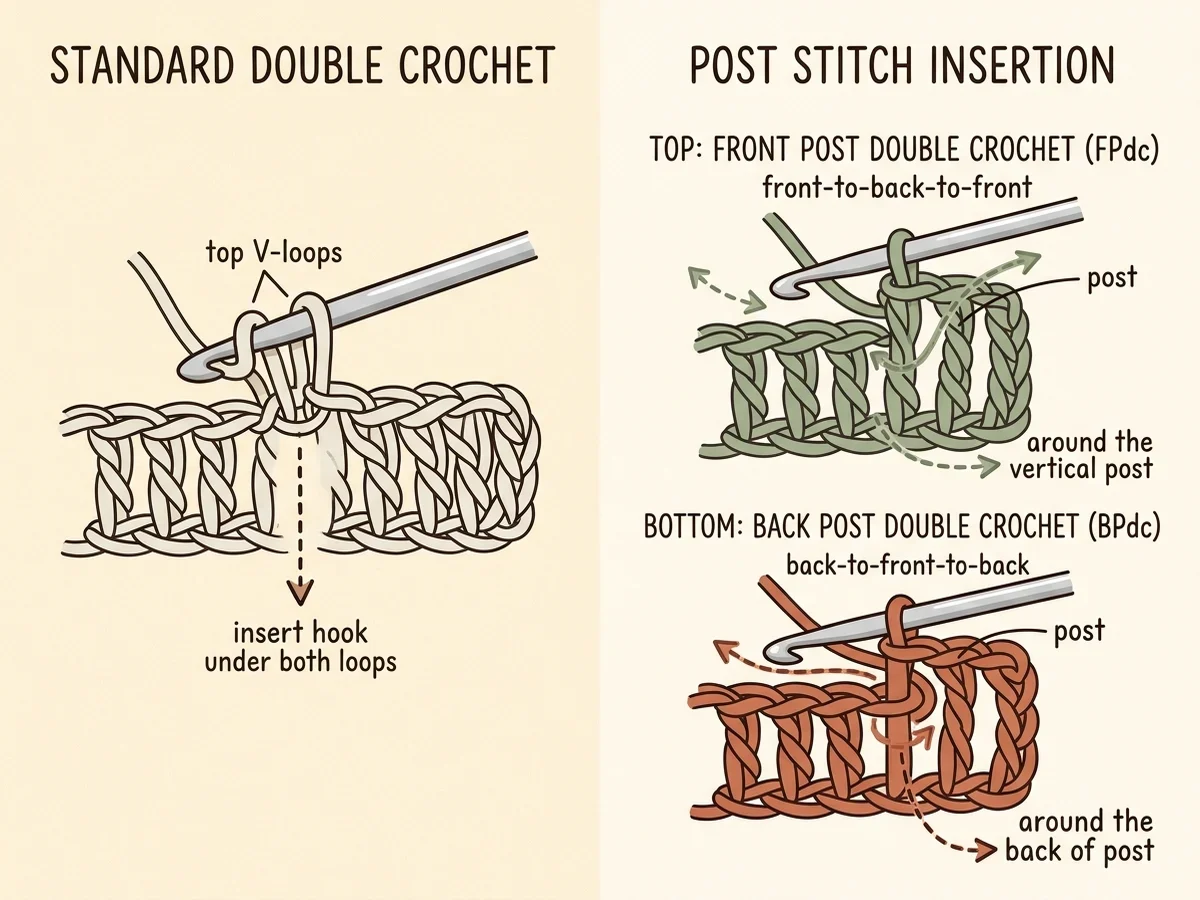
Post Stitch Anatomy: Top V-Loops vs. Vertical Post
In standard crochet, your hook always passes through the top of the stitch—either under both loops of the top V or into the back loop or front loop only (BLO/FLO). Post stitches ignore the top V-loops entirely and anchor around the body (post) of the stitch one row below.
Why Post Stitches Compress Row Height
Because your hook enters the space between the vertical posts—roughly halfway down the height of the stitch below—each new row of FPdc or BPdc overlaps the upper third of the previous row. This vertical overlap has three practical consequences for your projects:
- Shorter Row Height: A row of post stitches is noticeably shorter than a row of standard
dc. Always use a 2-chain turning chain (ch 2) instead ofch 3at the start of a post-stitch row so the turning chain does not bow outward along the selvedge. - Double-Thick Thermal Fabric: The unworked top V-loops fold forward (behind an
FPdcor across the front of aBPdc), creating a dense, cushioned fabric. - Extra Yarn Consumption: Because rows stack closer together vertically, you work more rows to reach the same length. Plan on roughly 20% to 35% more yarn (estimate) than flat double crochet, and check your project totals with our calculator for yardage for textured stitches.
How to Crochet Front Post Double Crochet (FPdc) Step by Step
You cannot work post stitches directly into a foundation chain; you must first work a base row of standard stitches (most commonly a row of standard double crochet).

- Work a Base Row: Chain your desired number of stitches and work 1 row of standard double crochet (
dc). Turn your work and chain 2 (ch 2) to bring the hook up to post-stitch height. - Yarn Over (
yo): Wrap the working yarn from back to front over your hook (2 loops on hook). - Insert Hook Front-to-Back-to-Front Around the Post: Locate the vertical stem (post) of the next stitch in the row below. Insert your hook from the front of your fabric into the space to the right of the post (left of the post if crocheting left-handed), pass the hook behind that vertical stem, and poke the tip back out to the front through the space on the other side of the post. The vertical stem should rest directly on top of your hook shaft.
- Yarn Over and Pull Up a Loop: Yarn over and draw the loop back around behind the post to the front (
3 loops on hook). Pull the loop up gently so it matches the height of a shortenedch-2edge stitch without tugging the fabric tight. - Yarn Over, Pull Through 2 Loops: Yarn over and draw through the first 2 loops on your hook (
2 loops remain). - Yarn Over, Pull Through 2 Loops: Yarn over and draw through the final 2 loops (
1 loop remains). Your completedFPdcnow pops forward in relief on the side facing you.
How to Crochet Back Post Double Crochet (BPdc) Step by Step
BPdc uses the exact same completion steps as FPdc, except you approach the vertical post from the back (away from you) so the stitch recedes away from the surface facing you.
- Yarn Over (
yo): Wrap the working yarn over your hook (2 loops on hook). - Insert Hook Back-to-Front-to-Back Around the Post: Reach your hook behind your work. Insert the hook tip from the back of the fabric to the front through the gap before the target post, pass the hook across the front of the vertical stem, and push the tip back through the gap on the far side of the post to the back. Looking down at your work, you will only see the hook shaft crossing horizontally across the front of the post.
- Yarn Over and Pull Up a Loop: Yarn over at the back of the work and draw a loop around the front of the post to the back (
3 loops on hook). Tilt the top of the previous row slightly toward you with your non-hook thumb so you can see the loops clearly. - Yarn Over, Pull Through 2 Loops (
Twice):[Yo, pull through 2 loops] twice(1 loop remains). The vertical post is pushed toward the away-facing side of your fabric, and the unworked top V-loops of the stitch below form a neat horizontal ridge across the front.
How to Work 1x1 and 2x2 Post-Stitch Ribbing (Flat vs. In the Round)
The #1 mistake crocheters make when learning post-stitch ribbing is working the exact same sequence on Row 2 as on Row 1 when turning their work, which breaks the vertical columns into a staggered checkerboard.
Rule 1: Working Post Ribbing in the Round (Hat Brims & Top-Down Cuffs)
When working in continuous or joined rounds with the Right Side (RS) always facing you, you never turn your work:
- Work
FPdcaround everyFPdcfrom the round below. - Work
BPdcaround everyBPdcfrom the round below.
Rule 2: Working Post Ribbing Flat in Turned Rows (1x1 Ribbing)
When you turn your work at the end of a row, a stitch that was raised on the front (FPdc) now faces you as a recessed post (BPdc) on the Wrong Side (WS). Remember the golden rule of post crochet: "Match what you see facing you."
- If the post below looks raised toward you, work an
FPdcaround it. - If the post below looks recessed away from you, work a
BPdcaround it.
1x1 Post Ribbing Pattern (Turned Rows)
- Foundation: Chain an even number of stitches.
- Row 1 (Base Row): Work
1 dcin the 4th ch from hook and in each ch across. Turn. (Count the skipped 3 chains as your firstdc— you should have an odd number of total posts, or work an even number of posts plus 2 standarddcselvedge border stitches). - Row 2 (
RS):Ch 2(counts as first half-height selvedgedc),*1 FPdc around next st, 1 BPdc around next st*; repeat from * to *across to the last stitch, work1 dcinto the top of the turning chain. Turn. - Row 3 (
WS):Ch 2,*1 FPdc around each post that protrudes toward you, 1 BPdc around each post that recedes away from you*across, ending with1 dcin the top of thech-2turning chain. Turn. - Note on Clean Edges: Always work a standard
dc(under both top V-loops) into the very first and very last stitch of every flat post-stitch row. Anchoring the edges with standard stitches gives you crisp, straight side borders for seaming.
Post-Stitch Ribbing vs. BLO Ribbing: Which Should You Choose?
Crocheters have two distinct ways to create elastic ribbing: Post-Stitch Ribbing (FPdc/BPdc) and Back Loop Only (BLO) Ribbing. Because each technique constructs its ridges in a different direction, choosing the right one depends on how your project is assembled.

Comparison Factor | Post-Stitch Ribbing ( | Back Loop Only ( |
|---|---|---|
Direction of Work | Worked in the same direction as the body of the hat or sweater (bottom-up or top-down directly off a foundation round) | Worked perpendicular (sideways) in short rows, then seamed and picked up along the side edge |
Elasticity & Recovery | Moderate stretch; relies on 3D corrugated accordion folds | High horizontal knit-like stretch and snap-back recovery |
Fabric Thickness & Drape | Thick, cushy, and structured (ideal for warm winter brims, boot cuffs, and sturdy borders) | Thinner, more flexible, and closer to hand-knitted 1x1 or 2x2 rib |
Yarn Consumption | Higher ( | Standard |
Full Tutorial | You are here | Read our complete BLO ribbing guide |
3 Classic Textures Built with FPdc and BPdc
Once you can switch smoothly between FPdc and BPdc, you automatically unlock three of crochet's most popular architectural stitch patterns:

1. Reversible Basketweave Stitch
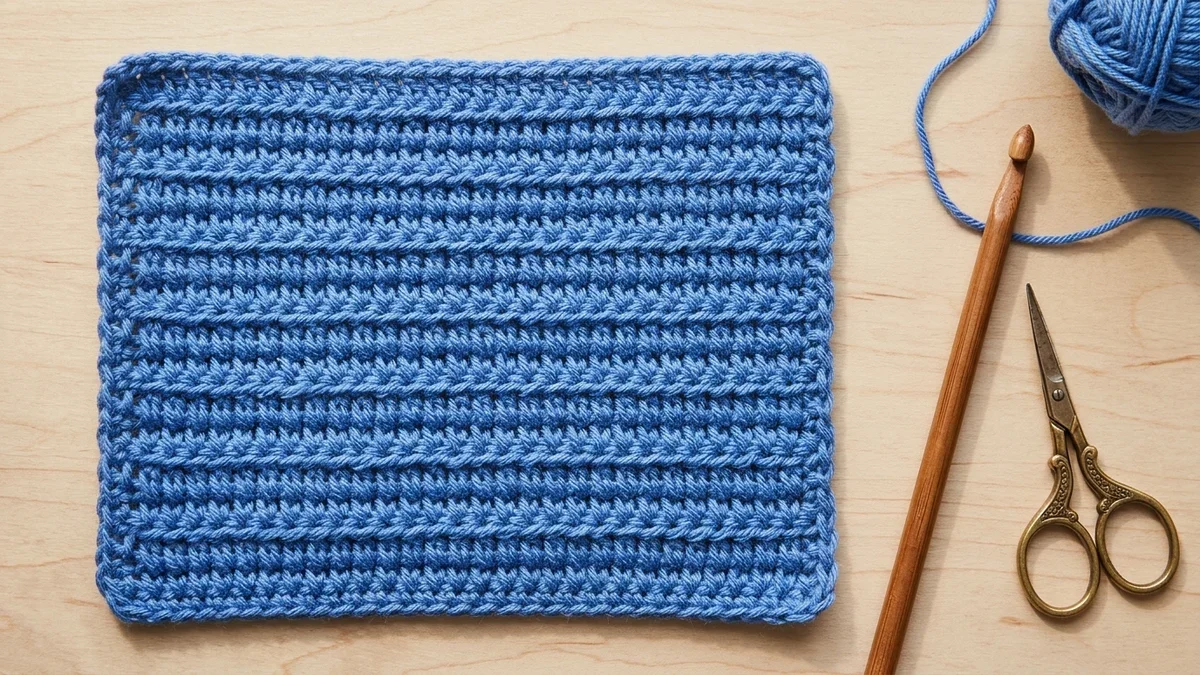
Worked in blocks of 4 FPdc, 4 BPdc for 3 to 4 rows before swapping (4 BPdc, 4 FPdc), the basketweave stitch mimics woven reed baskets. Because every front block has a matching recessed block on the reverse, basketweave is 100% reversible and never curls at the edges—making it a favorite for baby blankets, scarves, and thick kitchen pot holders.
2. Thermal Waffle Stitch
Alternating *Row 1: `1 FPdc, 2 dc` with Row 2: `1 dc, 2 FPdc`* creates raised vertical and horizontal grid lines on the Right Side with deep recessed thermal pockets. Waffle stitch traps warm air exceptionally well for winter throws and dishcloths.
3. Alpine Stitch
Alpine stitch alternates a row of flat single crochet (sc) on the Wrong Side with a Right-Side row that alternates 1 dc in the top of the sc row and 1 FPdc dropped two rows down around the dc post below. Because the FPdc reaches down two rows, pull your initial post loop up slightly higher (or use an extended double crochet post stitch) so the fabric does not curl toward the front.
Troubleshooting Common FPdc & BPdc Mistakes
1. "My stitch count keeps growing by 1 or 2 stitches every row!"
- Cause: After working an
FPdcorBPdcaround the vertical stem of a stitch, its unworked top V-loops are still visible just behind or in front of the post. Beginners often accidentally work a second stitch into those top V-loops. - Fix: Remember that 1 post stitch replaces 1 top-loop stitch. After wrapping around a post, skip its corresponding top V-loops completely and move directly to the next vertical stem.
2. "There is a wide gap at the beginning of every row."
- Cause: A standard
ch 3turning chain is taller than a post stitch, and working your first post stitch around the second stitch leaves an open hole beside the turning chain. - Fix: Use
ch 2at the start of every post-stitch row, or use a chainless standing double crochet /ch 1(does not count as a stitch) and work a standarddcdirectly into the very first stitch as a clean selvedge border.
3. "My in-the-round hat brim has an ugly diagonal jog at the seam."
- Cause: Joining each round to the top of a
ch-2chain creates a flat line beside raised post columns. - Fix: When working post ribbing in the round, join the round with a Front Post Slip Stitch (
FPslst) around the firstFPdcpost, thench 1(does not count as a stitch) and work your firstFPdcaround that very same post. Thech 1hides completely behind the raisedFPdccolumn.
Frequently Asked Questions (FAQ)
What is the difference between FPdc and DC FLO (Front Loop Only)?
Front Loop Only (DC FLO) inserts the hook under only the front strand of the top V-loop, creating a flat fabric with extra vertical drape and a subtle horizontal line on the back. Front Post Double Crochet (FPdc) wraps around the entire vertical body of the stitch below, creating a thick, 3D vertical cable column. Compare both in our BLO vs. FLO double crochet guide.
Do you work into the turning chain when doing front and back post crochet?
For flat rows, the cleanest method is to treat the first and last stitch of every row as standard border double crochets worked into the top V-loops rather than around the post of the turning chain. This gives your project straight, sturdy side edges that are easy to seam or border.
Why is my front post double crochet curling?
Curling almost always happens when you combine standard top-loop stitches with dropped post stitches (such as in Alpine stitch or cable patterns) and pull the post loop too tight. Either go up 0.5 mm to 1.0 mm in crochet hook size or pull up a taller golden loop when drawing yarn around the post.




Questions & notes
No comments yet
Sign in or create a free account to comment under your profile and keep track of your replies.
Your email address is never published. Comments are moderated under our Community Guidelines; see our Privacy Policy for how we use your details.