How to Fasten Off in Crochet and Weave in Ends
Finish your last stitch so it cannot unravel, then hide the yarn tails neatly and securely with a tapestry needle.

9 min read
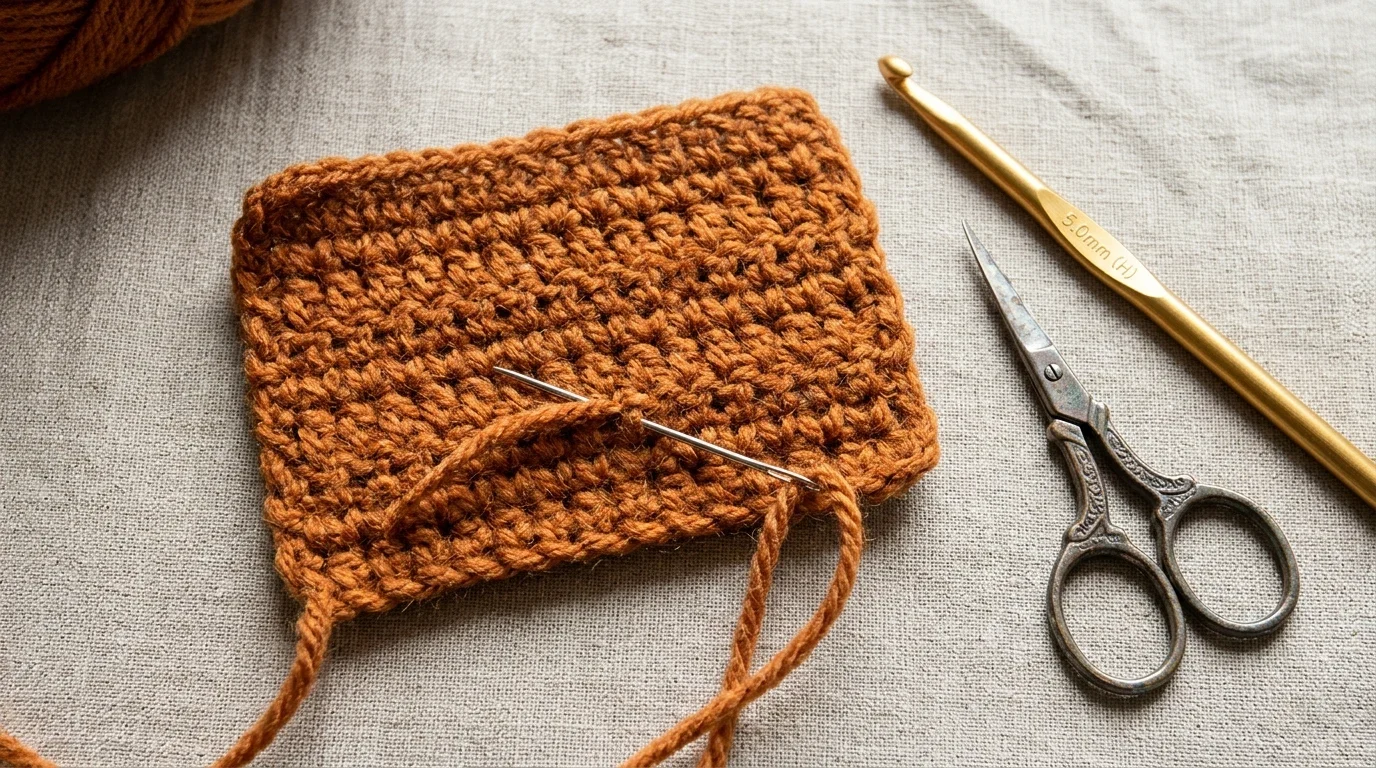
To fasten off in crochet, complete your final stitch, cut the working yarn leaving a 6-inch (15 cm) tail, yarn over once, and pull that cut tail completely out through the loop on your hook before pulling snug to lock the knot. To keep that knot from loosening in the wash, thread the 6-inch tail onto a blunt tapestry needle and weave it horizontally through the dense base of your stitches in three alternating directions before snipping the excess yarn flush.
US vs. UK terminology note: Both US and UK crochet patterns use the terms fasten off (sometimes written finish off or abbreviated FO) and weave in ends (or darn in ends in UK patterns) with the exact same meaning.
Fastening Off & Weaving In Quick Reference
Situation | Recommended Fasten-Off Method | Minimum Tail Length | Best Weave-In Technique |
|---|---|---|---|
Flat Rows (Blankets, Scarves, Dishcloths) | Standard | 6 inches (15 cm) | 3-direction horizontal weave through the dense base of stitches on the wrong side |
Final Round of a Motif, Hat, or Coaster | Invisible Needle Fasten-Off (replaces final slip stitch join) | 6 inches (15 cm) | Form a false |
Pieces That Will Be Sewn Together | Standard | 3× the length of the seam edge (18–36 in) | Use the long tail to seam the pieces first, then weave in the remaining 6 inches |
Amigurumi / 3D Stuffed Toys | Standard or invisible fasten-off | 6–8 inches (15–20 cm) | Plunge the needle straight through the stuffed body core 2–3 times and snip flush |
Slippery Yarns (Cotton, Bamboo, Silk) | Standard | 6–8 inches (15–20 cm) | Split-ply weaving (pierce directly through the yarn plies with a sharper needle) |
How to Fasten Off in Crochet (Step by Step)
Simply sliding your hook out of the last loop leaves a live stitch that will unravel the moment the fabric is stretched. Fastening off turns that final loop into a locked knot:
- Finish your final stitch completely: Work the last stitch of your row or round until 1 active loop remains on your hook.
- Cut a 6-inch (15 cm) yarn tail: Measure about 6 inches of working yarn from the hook and snip it with scissors. (Cutting a 1-inch tail is one of the most frustrating common beginner mistakes because a short stub is too short to thread onto a needle and will work its way loose.)
- Yarn over and pull the tail all the way through: Wrap the cut tail over your hook (
yo) and pull it through the loop on your hook. Keep lifting your hook straight up until the cut end pops completely out of the loop.

- Pull the tail snug: Tug downward on the yarn tail with your fingers until the loop closes into a tight, flat knot at the corner of your last stitch.
The Invisible Fasten-Off Join for Rounds
When you finish the final round of a coaster, granny square, or hat brim, joining with a standard slip stitch and chaining 1 to fasten off leaves a small knot bump on the edge. The invisible fasten-off uses a tapestry needle to build a "false V" that looks identical to every other stitch in the round:
- Do NOT work a final slip stitch: After completing the very last stitch of your round, cut a 6-inch (15 cm) tail and pull the loop on your hook straight up until the cut tail comes out of the top of the last stitch (with no extra
yoor knot). - Thread your tapestry needle: Place the cut tail onto a blunt yarn needle.
- Skip the starting chain and go under the first real stitch: Insert your needle from front to back under both top loops (
V) of the first actual stitch of the round (skipping any starting chain). Pull the tail gently through.

- Complete the false
Vinto the last stitch: Bring the needle back to the front and insert it straight down into the center of the topVof the very last stitch (where the tail originally came out), passing through the back bar behind it as well. - Adjust tension and weave in on the back: Pull the tail gently until the two strands bridging the gap match the exact size of the neighboring top
Vs. Flip the piece over and weave the tail securely into the back of the stitches in three directions.
How to Weave in Ends So They Never Come Out
Fastening off locks the last loop, but if you cut the yarn right next to that knot, everyday stretching and washing will pull the short end through the knot and unravel your work. Always weave at least 4 to 6 inches of tail into the fabric using the 3-direction change-direction rule:
1. On Solid Fabric (The 3-Direction Rule)
Why change direction? If you weave a tail in only one straight line, stretching the fabric opens the stitches and lets the tail slide right out. Changing direction twice—while skipping one strand at each turn—locks the yarn around a post like a U-turn so tension only tightens the grip:
- Direction 1 (Horizontal pass): Flip your work to the wrong side (back). Thread your tail onto a blunt tapestry needle and slide the needle horizontally through the dense lower loops at the base of 4 to 6 stitches (about 1.5 to 2 inches). Check the front of your work to make sure the metal needle isn't showing through, then pull the yarn through flat without puckering the row.

- Direction 2 (Reverse pass — skip 1 strand first!): Skip the very last strand your needle just exited (if you go back into the exact same hole, you will simply un-weave Direction 1!). Insert your needle in the opposite direction through the next 3 to 4 stitches, parallel to your first pass.
- Direction 3 (Final lock pass): Skip one strand again and weave forward through 2 to 3 stitches a third time. Pull the fabric slightly to let the tail settle inside the stitches, then snip the remaining yarn flush against the fabric.
2. On Lace or Openwork Fabric
In V-stitch, mesh, or filet crochet, there is no solid row base to hide a horizontal tail. Instead, weave your needle vertically up and down inside the twisted plies of a single tall double or treble crochet post, then turn and weave back down the neighboring post before snipping.
3. On Amigurumi and 3D Stuffed Toys
Because the inside of an amigurumi toy is completely hidden, you only need to anchor the knot first:
- Weave the needle under 1 or 2 stitches on the inside of the closing hole and pull snug.
- Push the long tapestry needle straight through the polyfill stuffing to exit between two stitches on the opposite side of the head or body.
- Re-insert the needle into the exact same gap between stitches it just exited and push it out a third spot across the toy. Pull the tail slightly taut and snip it flush—the end will snap back inside the stuffing and disappear.
4. On Stripes and Colorwork
Always weave each colored tail into a section of the exact same yarn color—never weave a dark navy tail into the back of a cream stripe, or it will shadow through to the front of the blanket.
How to Secure Slippery Yarns (Cotton, Bamboo, and Silk)
Wool and standard acrylic yarns have microscopic scales or crimp that grab onto neighboring fibers after one or two washes. Smooth plant and luxury fibers—such as mercerized cotton, bamboo, viscose, Tencel, and silk—have almost zero surface friction and can wiggle out of standard weaving.
To lock slippery yarns permanently, use split-ply weaving:
- Swap your blunt tapestry needle for a slightly sharper crewel or embroidery needle.
- As you weave in your 3 directions, intentionally pierce right through the center of the yarn plies of the stitches on the back of your work (splitting the strand in half) rather than just sliding under whole loops. Piercing the plies creates physical friction that even silky bamboo yarn cannot slip out of.
Fewer Ends to Weave: Crocheting Over Tails and the Russian Join
Nobody loves weaving in 40 ends at the end of a striped project. You can cut your finishing time in half with two techniques:
1. Crocheting Over Your Tails as You Go
When you join a new yarn color or start Row 1, lay the loose yarn tail flat along the top Vs of the row below. Insert your hook into the stitch underneath both the top V and the resting yarn tail, then complete your stitch as normal so the new stitches encase the tail inside the row.

Crucial rule: Crocheting over a tail in one straight direction is not enough for blankets or garments that will be washed—the tail can still slide out of the tube of stitches. Crochet over the tail for 4 to 5 stitches, drop the remaining 4-inch tail to the back of your work, and later use a needle to weave that remaining stub back in the opposite direction once to lock it.
2. The Russian Join (Zero-Waste, No-End Yarn Join)
When joining a new ball of yarn in the middle of a row, you can avoid leaving any tails at all by using a Russian join—threading each yarn end back inside its own plies with a needle so the two strands interlock in a smooth, knot-free loop. See this technique in action in our Russian join color-block cowl pattern.
Frequently Asked Questions
How long of a yarn tail should I leave when fastening off?
Always leave at least 6 inches (15 cm) of yarn when fastening off. A 6-inch tail is long enough to maneuver comfortably on a 2.5-inch tapestry needle through three direction changes without having to re-thread the needle on every pass.
Can I just tie a knot and cut the yarn close instead of weaving in ends?
No—cutting yarn right next to a knot is one of the riskiest common beginner mistakes. Even a tight square knot or "magic knot" can untie under tension or in the washing machine if the tails are clipped flush, leaving a hole in the middle of your blanket with zero yarn left to repair it. Plus, hard knots create uncomfortable lumps in garments and baby blankets.
Do I need to weave in the starting tail of a magic ring?
Yes—never cut a magic ring tail without weaving it in first! A magic ring is just an unknotted loop cinched shut by friction. If you pull the center closed and snip the tail right at the ring, the center of your granny square or amigurumi will open up and unravel from the inside out. Always weave the magic-ring tail around the base of Round 1 in one direction, skip a strand, and weave back in the opposite direction to lock the ring shut.
Should you weave in ends before or after blocking?
You can weave in your ends before blocking, as long as you do not snip the final ½-inch stub until after the piece has dried. Weaving in before wet-blocking or steam-blocking lets the fibers relax and settle together; once the fabric is dry and stretched to its final dimensions, snip the tiny remaining tips flush.


Questions & notes
No comments yet
Sign in or create a free account to comment under your profile and keep track of your replies.
Your email address is never published. Comments are moderated under our Community Guidelines; see our Privacy Policy for how we use your details.