How to Slip Stitch in Crochet (sl st)
The slip stitch has almost no height. Use it to join rounds, move across your work without adding height, and make neat edges.

14 min read

Stitch at a glance
- US terms
- Slip stitch
sl st - UK terms
- Slip stitch
ss
To make a slip stitch in crochet, insert your hook into the target stitch, wrap the yarn over the hook from back to front, and pull that new loop straight through both the stitch and the loop already on your hook in one motion. You finish with one loop on your hook and almost zero added height.
In both US and UK crochet patterns, this stitch is called a slip stitch—abbreviated sl st in US patterns and ss (or sl st) in UK patterns. Because it lies nearly flat against the fabric, you will use it in almost every project to close rounds, join motifs, travel across stitches without cutting your yarn, and work knit-look ribbing.
Slip Stitch Quick Reference
Property | Standard Specification |
|---|---|
US Name & Abbreviation | Slip stitch ( |
UK Name & Abbreviation | Slip stitch ( |
Relative Height | Shortest crochet stitch (flatter than single crochet) |
Turning Chain |
|
Chart Symbol | Filled black dot ( |
Counts as a Stitch? | No when joining rounds or traveling; Yes when worked as rows of slip stitch fabric or edging |
How to Slip Stitch (Step by Step)
Before you begin, keep a relaxed grip on your working yarn. The slip stitch has no vertical post, so pulling the loop snug makes the top V shrink against the hook and turns the next row into a struggle.
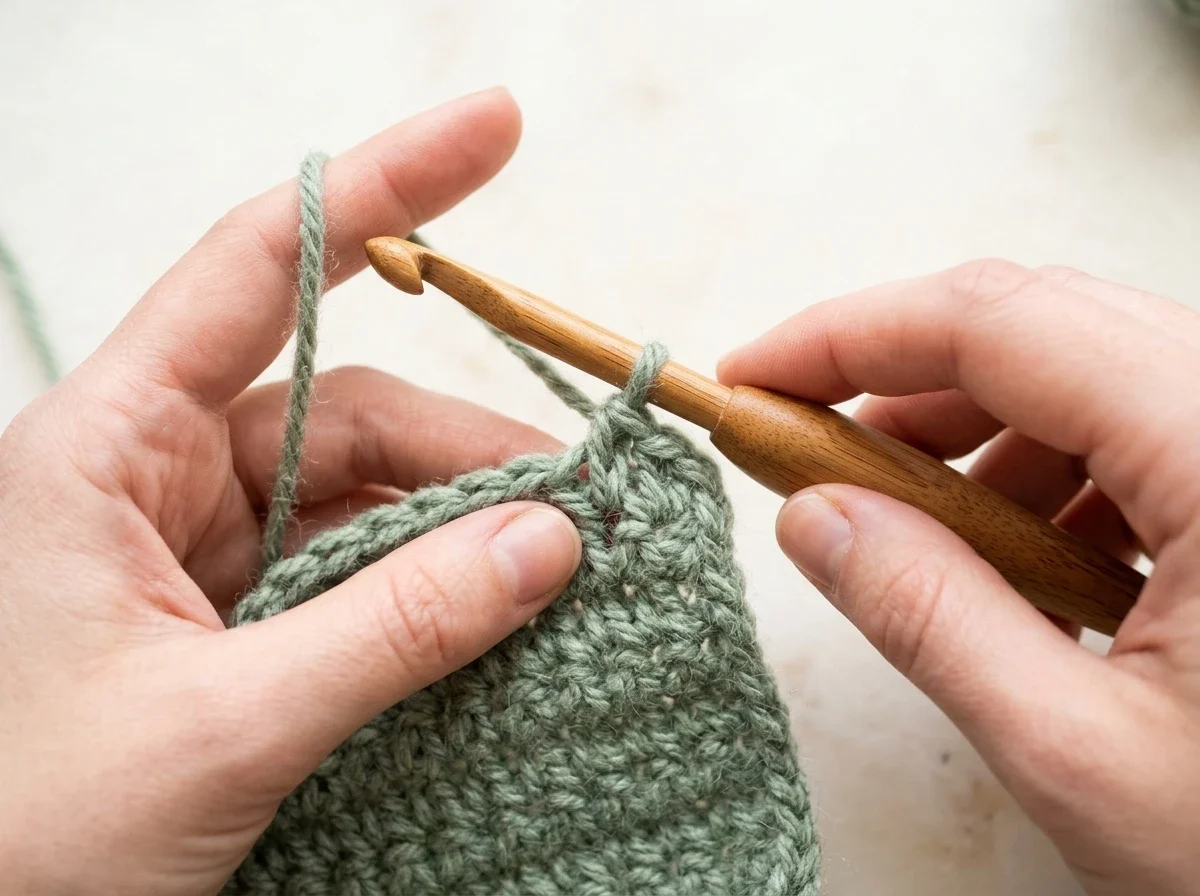
- Insert the hook: Push the tip of your hook under both loops of the top
Vof the next stitch (or into the chain space specified by your pattern). You now have the original active loop on your hook plus the stitch loops in front of it. - Yarn over (
yo): Bring the working yarn behind your hook and drape it over the top from back to front, catching it in the hook throat. - Pull through everything in one motion: Draw the yarn-over loop through the stitch and straight through the active loop already on your hook. Keep the new loop parallel in size to the loop that was on your hook rather than tugging the tail tight.
- Check your hook: One loop remains on your hook, and a flat horizontal
Vnow sits snug against the edge.
Slip Stitch vs. Single Crochet vs. Slip Knot
Beginners often run into two look-alike mix-ups when learning the slip stitch:
- Slip stitch (
sl st) vs. single crochet (sc, UK double crochetdc): Both start the same way—insert the hook into the stitch, yarn over, and pull up a loop so there are 2 loops on your hook. For a slip stitch, you do not yarn over a second time; you pull that first drawn-up loop directly through the loop already on your hook. If you yarn over again and pull through 2 loops, you have made a single crochet instead. - Slip stitch vs. slip knot: A slip knot is the adjustable loop you tie onto your bare hook before your very first chain; it never counts as a stitch. A slip stitch is an actual stitch worked with your hook into existing chains or stitches.
Three Ways Patterns Use "Join with a Slip Stitch"
When a pattern says "join with a sl st," it can mean three different jobs depending on where you are in the project.
1. Forming a Starting Center Ring
Many motifs and hats start with a short chain joined into a ring instead of a magic ring.
- Example instruction:
Ch 6, join with a sl st in first ch to form a ring. - How to work it: Make 6 chains. Without twisting the chain, insert your hook into the very first chain you made (the one farthest from your hook, right next to your slip knot). Yarn over and pull through both that first chain and the loop on your hook. You now have a closed 6-chain ring ready for Round 1.
2. Closing a Joined Round
When working flat circles, hats, or granny square joins in joined rounds, a slip stitch connects the last stitch of the round to the first stitch so the edge forms a continuous circle.

- Where to insert your hook: Work the final stitch of the round. Skip any starting chain that does not count as a stitch (such as a
ch 1at the start of a single crochet round) and insert your hook under both top loops of the first real stitch of the round. If your round began with ach 3that does count as the first double crochet, insert your hook into the top chain (the 3rd chain) of that startingch 3. - How to avoid the +1 stitch-count mistake: When you close a round of 12 stitches with a
sl st, the top of that slip stitch forms a small horizontalVsitting right between Stitch 12 and Stitch 1. Do not work into that joining slip stitch on the next round, or your 12-stitch round will accidentally grow to 13 stitches. Place a stitch marker in the first and last real stitch of the round so you always skip the flat slip stitch at the seam. - Want a completely invisible join when changing colors? Instead of joining with a slip stitch and chaining up, you can start the new round with a standing double crochet (no slip-stitch join).
3. Joining New Yarn with a Slip Stitch
When a pattern tells you to "join new yarn with a sl st in any stitch or ch-sp":
- Place a slip knot of the new yarn on your bare hook.
- Insert the hook into the stitch or chain space indicated in the pattern.
- Yarn over with the new working yarn and pull it through both the fabric and the slip knot loop on your hook. Your new yarn is securely attached and ready for your starting chain or stitches.
Moving Across a Row (Traveling Without Adding Height)
Sometimes a pattern needs your working yarn to start several stitches inward from the edge—for example, when shaping an armhole indent, stepping across to a corner chain-space in a granny square, or centering a motif.

Instead of cutting the yarn and weaving in two extra tails, turn your work and work one sl st into each stitch you need to skip. Because the slip stitch is much flatter than single crochet, half double crochet, or double crochet, the edge steps inward cleanly without building row height. Once your hook reaches the target stitch or space, chain up and work the row as written.
Slip Stitch Seams and Surface Slip Stitch
Flat and Ridged Slip Stitch Seams
A slip stitch seam joins two finished panels or squares using your crochet hook rather than a yarn needle. Unlike a whip-stitched seam, a slip stitch seam has a little natural give so it moves with the fabric.

- Choose your seam side: Hold the two pieces with right sides together if you want the seam hidden on the inside of a garment or bag, or wrong sides together if you want a raised decorative ridge on the front.
- Match stitch for stitch: Put a slip knot on your hook. Insert the hook through both pieces at the first corner stitch, yarn over, and pull through all loops on the hook.
- Choose your loops:
- Through both top loops of both pieces (4 loops on hook): Creates a sturdy structural seam for bag sides and sweater shoulders.
- Through back loops only (or inner loops touching each other, 2 loops on hook): Creates the flat slip stitch (zipper) join, where the joined chain lies flat between the two squares without a raised ridge.
- Check your tension: Pull each slip stitch up to match the width of one stitch on the panels before pulling through the loop on your hook. If the seam puckers, go up one hook size (for example, from
5.0 mmto5.5 mm) just for the seaming row. When you reach the end of the seam, fasten off and weave in the tails.
Surface Slip Stitch (Surface Crochet)
Surface slip stitch works like chain-stitch embroidery across the face of finished crochet fabric. You can use it to draw lettering, add contrasting stripes over a plain blanket, or reinforce a neckline edge so it does not stretch out.

- Make a slip knot with your contrasting yarn, take the knot off your hook, and hold it behind (on the wrong side of) your crochet fabric.
- Push your bare hook from the front (right side) to the back (wrong side) through a space between stitches where your line begins.
- Place the slip knot onto the hook behind the fabric and pull the loop through to the front. Keep the knot and the working yarn ball on the back side at all times.
- Insert your hook from front to back into the next space along your path, yarn over on the back side of the fabric, and pull that loop to the front and straight through the loop on your hook.
- Repeat Step 4 along any straight or curved line, keeping your loops relaxed so the underlying fabric stays flat.
Slip Stitch Fabric and Stretchy BLO Ribbing
When worked back and forth in rows on its own—a historic technique known as Bosnian crochet (or shepherd's knitting)—the slip stitch creates a dense, windproof fabric. When worked in the back loop only (BLO), it forms the stretchiest knit-look ribbing in crochet, ideal for hat brims, sock cuffs, and sweater hems.

Worked Example: 10-Stitch BLO Slip Stitch Ribbing Swatch
Use a smooth worsted-weight yarn and a hook one size larger than you use for single crochet so the back loops stay easy to enter:
- Foundation:
Ch 11(10 working chains + 1 turning chain). - Row 1: Insert hook into the 2nd ch from hook,
yo, and pull through both loops (1 sl stmade). Work1 sl stin each remaining chain across.Ch 1(does not count as a stitch), turn. — Arithmetic check:11 chains − 1 skipped turning chain = 10 sl st. - Row 2: Looking down at the top edge of Row 1, locate the two strands of each
V. Insert your hook under the back loop only (BLO)—the strand farthest from you—of the 1st stitch and each stitch across.Ch 1, turn. — Arithmetic check:10 sl st in BLO. - Rows 3–20: Repeat Row 2. Every 2 rows form 1 raised knit-like rib on each side of the reversible fabric (
20 rows ÷ 2 = 10 raised ribs). - Neat brim-edge tip: For hat bands or cuffs, work the first 9 stitches of each row in the
BLO, then work the 10th (final) stitch through both loops. Catching both loops on the outer edge prevents the end stitches from stretching into loose loops.
Yarn-Over Slip Stitch (yo sl st) Variation
If standard BLO slip stitch ribbing feels too tight or slow, try the yarn-over slip stitch (also called half double slip stitch, abbreviated yo sl st or hdss):
- Yarn over first, then insert your hook into the back loop of the next stitch.
- Yarn over again and pull through the stitch (3 loops on hook), then immediately pull that same loop through the remaining 2 loops on your hook in one smooth motion.
The initial yarn-over gives you a slightly taller, plumper rib that is easier to see and enter on the following row.
Common Slip Stitch Mistakes and How to Fix Them
- Stitches are too tight to work into on the next row: Because a slip stitch has no post, pulling the working yarn after completing the stitch shrinks the top
Vdown to the narrow throat of your hook. Slide each new loop onto the full cylindrical shaft (barrel) of your hook before pulling through, relax your yarn hand, or go up0.5 mmto1.0 mmin hook size when working BLO slip stitch ribbing. - Joined rounds keep gaining an extra stitch (crooked or flaring seam): The joining slip stitch at the end of a round leaves a small horizontal
Vat the base of your turning chain. If you work into that joiningsl ston the next round, your count increases by 1 stitch per round. Put a stitch marker in your first and last real stitch so you always skip both the joiningsl stand the non-countingch 1. - Doing a slip stitch when you meant to do a single crochet: If your single crochet fabric looks flat, stiff, and half as tall as expected, check whether you are yarning over a second time. Pulling the first yarn-over straight through the loop on your hook makes a slip stitch; pulling up a loop (2 loops on hook), yarning over a second time, and pulling through both loops makes a single crochet.
- Puckered slip stitch seams or surface crochet: Your slip stitch length must match the width of the stitches you are crossing. Draw each loop up until it equals the height of one stitch on the base fabric before pulling it through the loop on your hook.
US and UK Names, Chart Symbol, and Pattern Notes
Unlike taller basic stitches that shift names between US and UK patterns, slip stitch is called slip stitch in both systems:
- US patterns: Abbreviated
sl st(pluralsl sts). - UK patterns: Abbreviated
ss(orsl st). - Crochet chart symbol: A solid black dot (
•) or small filled oval placed directly where the stitch joins or travels. - Turning chain rule: A row of slip stitches starts with
ch 1, and that turning chain never counts as a stitch. Always work the first stitch of the new row into the very first stitch at the base of thech 1.
Frequently Asked Questions
Does a slip stitch count as a stitch in crochet?
No—in almost all patterns, a slip stitch used to join the end of a round or move across stitches is a utility action and does not count toward your stitch total for that round or row. It only counts as a stitch when the pattern is deliberately building rows or rounds out of slip stitches (such as BLO slip stitch ribbing, Bosnian crochet, or a slip-stitch border), and the pattern's stitch count at the end of the row will include sl sts.
Why are my slip stitches so tight I cannot get my hook into them?
Because a slip stitch has no vertical post, tugging the working yarn after pulling through shrinks the top V down to the width of the hook's throat. Slide each new loop up onto the full shaft (working barrel) of your hook before pulling it through the loop on the hook, or switch to a hook 0.5 mm to 1.0 mm larger whenever you work rows of slip stitch ribbing or surface crochet.
Which loop do I slip stitch into when joining a round?
Insert your hook under both top loops (the front and back strands of the V) of the first real stitch of the round—skipping any ch 1 or ch 2 turning chain that does not count as a stitch. If the starting chain does count as a stitch (such as ch 3 in double crochet rounds), insert your hook into the top chain of that starting chain.
What is the difference between a slip stitch and a single crochet?
A slip stitch pulls the first yarn-over loop straight through both the stitch and the loop already on your hook in one step, adding almost no height. A single crochet pulls up a loop (leaving 2 loops on the hook), then requires a second yarn over pulled through both loops, creating a short vertical post.
Do I slip stitch at the end of every round in amigurumi?
Only if the pattern is written in joined rounds (which end with "join with a sl st to first st, ch 1"). Most amigurumi patterns are worked in continuous spiral rounds, where you skip the slip stitch join and work the first stitch of the new round directly into the first stitch of the previous round, moving a stitch marker up as you go.
Can you crochet a whole garment or blanket using only slip stitches?
Yes—working entire rows of slip stitches (usually in the back loop or front loop only) is known as Bosnian crochet. Because each row adds very little height, a slip-stitch fabric takes many more rows than single or double crochet, so it is most often used for hat brims, cuffs, belts, and bag straps rather than full blankets.


Questions & notes
No comments yet
Sign in or create a free account to comment under your profile and keep track of your replies.
Your email address is never published. Comments are moderated under our Community Guidelines; see our Privacy Policy for how we use your details.