Standing Double Crochet Tutorial: How to Join New Yarn Seamlessly Without Chains
Start a new color with a full double crochet straight from a slip knot, with no slip-stitch bump or skinny chain.

11 min read

Stitch at a glance
- US terms
- Standing double crochet
standing dc - UK terms
- Standing treble crochet
standing tr
Think about the traditional way most pattern books tell you to join a new color of yarn at the start of a granny square round or a striped blanket row: "Join new yarn with a slip stitch in the corner space, chain 3 (counts as first double crochet)."
Have you ever looked closely at that corner once the round is finished? First, the slip stitch creates a tight little knot bump at the base. Second, the three chain stitches stand up as a skinny, twisted pillar that looks completely different from the plump double crochets beside it. And third, when you come back around to join the end of the round with a slip stitch into the 3rd chain, the chain separates and leaves a tiny keyhole right at the seam!
The Standing Double Crochet (abbreviated st dc or Standing dc) eliminates the slip stitch and the starting chain completely. Instead of attaching the yarn to the fabric first and then chaining up, you begin with a slip knot on your hook in mid-air, wrap the yarn around the hook, and work a true, full-bodied double crochet stitch directly into the fabric from a "standing start."
In this tutorial, we will clarify the difference between a Standing Double Crochet (joining a new strand of yarn) and row-turning alternatives, walk step by step through the "Index Finger Anchor" trick that keeps the slip knot from spinning on your hook, and show you how to use standing joins in granny squares, temperature blankets, and post-stitch borders.
US vs. UK Terminology Note
In US crochet terminology, this technique is called a Standing Double Crochet (standing dc or st dc). In UK crochet terminology, where a US double crochet is a treble crochet, it is called a Standing Treble Crochet (standing tr or st tr). If you are following an international motif pattern, check our US vs. UK Crochet Terms Guide.
Important Distinction: Standing Double Crochet vs. Same-Strand Turning Stitches
Because crochet bloggers occasionally mix up the names of chainless starts, let us make an important distinction right up front:
- When You Are Continuing With the SAME Strand of Yarn at the Start of a New Row: Your yarn is already attached to the fabric. In that situation, use the Stacked Single Crochet (
Stsc) or Chainless Starting Double Crochet (CSDC) taught in our guide on How to Get Straight Edges in Double Crochet. - When You Are Joining a BRAND-NEW Strand or Color of Yarn: Your new yarn is sitting in your hand completely detached from the project. That is when you use the Standing Double Crochet!
Why the Traditional Sl St + Ch 3 Join Leaves a Visible Seam
When you join a new color with sl st + ch 3, you are actually creating four vertical links (1 slip stitch + 3 chains) that have no horizontal yarn-over wrap around their middle. Even worse, when you finish a round of a granny square or hat and slip-stitch into the top of that ch 3, the top chain loop gets pulled sideways toward the last stitch, leaving a noticeable V-shaped notch along the top edge.
By contrast, a Standing Double Crochet has:
- A True Double Crochet Post: It contains the exact same initial yarn-over and two double-loop pull-throughs as every other stitch in the round.
- A True Horizontal Top "V" Head: The slip knot that starts on your hook becomes the clean top "V" of the stitch—giving you two sturdy, unmistakable strands to slip-stitch into at the end of the round (or work into at the end of the next row)!
Step-by-Step Tutorial: How to Work a Standing Double Crochet (The Finger-Anchor Trick)
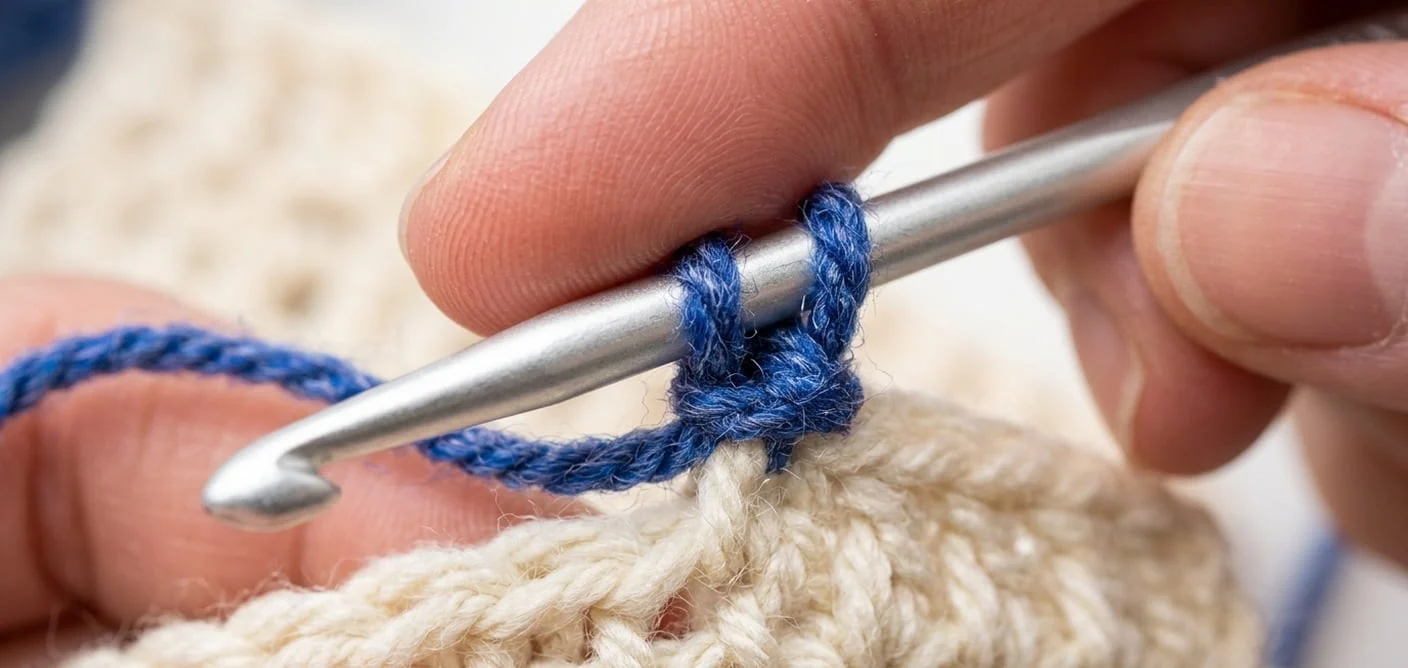
The most common mistake beginners make when trying a Standing Double Crochet is letting go of the slip knot on the hook—which causes the yarn-over and the slip knot to spin around each other and unravel in mid-air.
The secret is your dominant index finger: it acts as a gentle brake pressing both the slip knot and the yarn-over against the hook shaft until the stitch is complete!
Step-by-Step Instructions
- Place a Slip Knot on Your Hook:
Take your new strand of yarn and make a regular slip knot about 5 inches from the tail end. Slide the slip knot onto your crochet hook and snug it gently so it matches the diameter of the working shaft (not choked down tight, and not floppy).- Pro Tip: Hold the 5-inch tail against the handle of your hook with your ring and pinky fingers so the slip knot cannot untie itself!
- Yarn Over and Anchor With Your Index Finger:
With the working yarn held in your yarn hand as usual, wrap the yarn over your hook shaft from back to front (yarn over). You now have the slip knot + 1 yarn-over on your hook. Immediately place the tip of your hook-hand index finger firmly on top of both the slip knot and the yarn-over to pin them in place against the metal shaft. - Insert Hook Into the Target Stitch or Space and Pull Up a Loop:
Keeping your index finger pinned on the two loops on your hook, insert the tip of your hook into the stitch or chain-space where your pattern says to join the new yarn. Yarn over and pull up a loop through the stitch/space. You now have 3 loops on your hook (just like a regular double crochet!). - First Pull-Through (
Pull Through 2):
Still steadying the back slip knot with your index finger (or letting the tension of the stitch hold it), yarn over and pull through the first 2 loops on your hook (2 loops remain on hook). - Final Pull-Through (
Pull Through 2):
Yarn over and pull through the remaining 2 loops on your hook (pulling right through the initial slip knot!). Your Standing Double Crochet is complete and stands completely upright on its own!
How to Work Standing Variations: Standing FPdc, Standing Cluster, and Standing V-Stitch
Once you master the basic Standing Double Crochet, you can apply the exact same slip-knot-on-hook start to any textured variation in the double crochet family:
- Standing Front Post Double Crochet (
Standing FPdc):
Ideal for starting a contrasting color round on a Waffle Stitch blanket or adding a ribbed cuff in a new color! Simply place the slip knot on your hook, yarn over (pinning with your index finger), insert your hook from front to back to front around the vertical post of the target stitch, pull up a loop, and complete as[yo, pull through 2] twice. - Standing 3-DC Cluster (Bobble / Puff / Granny Cluster Start):
When starting a cluster stitch in a new color, work a Standing Double Crochet until 2 loops remain on your hook (leaving the last pull-through unfinished), work your next 1 or 2 partial double crochets into the same space, and then yarn over and pull through all loops on your hook! - Standing Linked Double Crochet (
Standing LDC):
Start your row or round with a normal Standing Double Crochet in the first stitch. Then, to make Stitch #2 as a Linked Double Crochet, insert your hook directly under the horizontal middle bar of your Standing Double Crochet, pull up a loop, and proceed across the row!
Worked Project Example: Saving Time & Improving Finish on Granny Squares and Temperature Blankets
Where does the Standing Double Crochet make the biggest difference in your crochet life? On projects with dozens or hundreds of color changes—specifically Granny Square Blankets and 365-Day Temperature Blankets!
Example 1: A 100-Motif Granny Square Blanket
Suppose you are making a throw blanket out of 100 four-round granny squares (which you can lay out and size in our Granny Square Blanket Calculator), changing colors on every single round:
- That blanket contains 100 squares × 4 rounds = 400 color joins.
- With traditional
sl st + ch 3joins, every single square has 4 skinny chain posts and 4 corner knot bumps. - With a Standing Double Crochet used to start the first
3-dccluster of each round:- Work
1 Standing dc + 2 regular dcinto any corner space. - When you finish the round and return to that starting corner, work your final
3 dc + ch 2, and join with a slip stitch (or invisible needle join) right under the full two-strand top "V" of your Standing Double Crochet! Every cluster around the square looks the same.
- Work
Example 2: A 365-Row Temperature Blanket
If you are making a daily Temperature Blanket in double crochet or Moss/Granny stripes, you may change colors 200 to 300 times across the year. Using a Standing Double Crochet at the start of every new temperature color row—and crocheting directly over the 5-inch slip-knot tail for the first 6 stitches—keeps both outer borders of your temperature blanket completely flat and bump-free!
Common Mistakes When Learning the Standing Double Crochet (And How to Fix Them)
1. The Top "V" of the Standing Stitch Pulls Loose When You Let Go of the Tail
- Why It Happens: Because a Standing Double Crochet starts with a slip knot on the hook, pulling on the short starting tail can loosen or tighten the top loop if the slip knot was made backward (where the working yarn slides instead of the tail, or vice versa).
- The Fix: Make your slip knot so that pulling the short tail tightens the loop. Once you complete the Standing Double Crochet, give the short tail a gentle tug to snug the knot against the top V, and then weave that tail securely in two directions (or crochet over it for 5 stitches and then weave the tip back).
2. A Long Diagonal Strand Stretches Behind the First Stitch
- Why It Happens: When you held the slip knot on your hook in Step 2, you let the slip knot slide 1 inch up the hook handle away from the yarn-over before inserting the hook into the fabric.
- The Fix: Keep the slip knot and the yarn-over touching each other side by side right behind the throat of the hook under your index finger. When they sit right next to each other, there is zero excess slack behind the stitch!
Frequently Asked Questions
Can I work a Standing Single Crochet (standing sc) or Standing Half Double Crochet (standing hdc) too?
Yes! They are even easier than the Standing Double Crochet:
- Standing Single Crochet (
standing sc): Place a slip knot on your hook (do not yarn over), insert your hook into the stitch, yarn over and pull up a loop (2 loops on hook), yarn over and pull through both loops! - Standing Half Double Crochet (
standing hdc): Place a slip knot on your hook, yarn over (pinning with your index finger), insert hook into the stitch, yarn over and pull up a loop (3 loops on hook), yarn over and pull through all 3 loops!
Should I start my Standing Double Crochet in the exact same stitch where I fastened off the old color?
- On Flat Turned Rows: Yes—after fastening off the old color and turning your work, work your Standing Double Crochet into the very first stitch at the start of the row.
- On Joined Rounds (Granny Squares, Hats, Bags): No! To prevent a buildup of woven-in tails in one spot, start your new color in a different corner or 4 to 5 stitches away from where you fastened off the previous round. Because the Standing Double Crochet is virtually invisible, starting in a fresh corner distributes your yarn tails evenly!
How do I join the end of a round into a Standing Double Crochet completely invisibly?
For the ultimate seamless finish on granny squares or color-block stripes: when you finish the last stitch of the round, cut your yarn leaving a 5-inch tail, pull the loop straight up out of the last stitch, thread the tail onto a tapestry needle, pass the needle under both top loops of the second stitch (skipping the top of the Standing Double Crochet), and then insert the needle back down into the center of the last stitch you made (the Invisible Needle Join). It creates a faux top "V" directly over your Standing Double Crochet with zero slip-stitch bump!
Conclusion and Next Steps
Taking two minutes to practice the Standing Double Crochet—and training your index finger to hold the slip knot and yarn-over steady on the hook shaft—will permanently upgrade the look of every multi-color project you ever make. Say goodbye to skinny chain-3 corners and knotty slip-stitch bumps, and enjoy starting every new yarn ball with a full, plump double crochet post.
Ready to put your seamless color joins to work?
- Plan your motif counts and layout dimensions in our free Granny Square Blanket Calculator.
- Curious which double crochet stitch variations create the strongest, most structured fabric for totes and handbags? Read The 7 Best Double Crochet Stitches for Sturdy Bags and Totes.


Questions & notes
No comments yet
Sign in or create a free account to comment under your profile and keep track of your replies.
Your email address is never published. Comments are moderated under our Community Guidelines; see our Privacy Policy for how we use your details.