

Pattern at a glance
- Hook
- 5.0 mm (US H-8)
- Yarn
- Worsted-weight cotton in several colours
- Finished size
- Depends on your squares: about 11 × 11 in (28 × 28 cm) with 5.5 in squares
- Gauge
- Make all squares the same size
- Terms
- US terms
Materials
- Worsted-weight (#4) cottonCotton is sturdy and does not stretch much
- 5.0 mm (US H-8) crochet hook
- Tapestry needle
- Fabric lining (optional)Stops small items poking through
Abbreviations
- ch
- chain
- dc
- double crochet
- sc
- single crochet
- sl st
- slip stitch
- st(s)
- stitch(es)
By the DoubleCrochet Team | Last Updated: November 2026 | Skill Level: Easy / Confident Beginner
This granny square tote bag uses 8 five-round classic granny squares (5" × 5" / 12.5 × 12.5 cm each, estimate), about 320 to 380 yards (290 to 350 m) (estimate) of Category 4 medium worsted-weight cotton yarn, and a 4.5 mm (US 7) crochet hook to build a sturdy 10" × 12" (25.5 × 30.5 cm) (estimate) everyday shoulder tote finished with a 3-round double crochet top band and two reinforced 22-inch (56 cm) handles.
Unlike complex 13-square or 24-square patchwork bags that require diagonal gusset folding and tricky valley decreases, this beginner-friendly 8-square 2 × 2 flat panel layout assembles in straight horizontal and vertical seams. Each square takes under 15 minutes to crochet, making it an ideal weekend stash-buster—and you can preview your motif palette before picking up your hook using our interactive tool to plan your colours.
Eight 5-round classic granny squares arranged in two 2×2 panels create a structured everyday book tote with a double crochet top band and non-stretch cotton straps.
Project Specifications & Materials
Finished Dimensions & Gauge
- Single 5-Round Motif Size (Blocked):
5" × 5" (12.5 × 12.5 cm)(estimate) - Joined Panel Size (
2 × 2Grid):10" wide × 10" tall (25.5 × 25.5 cm)(estimate) - Finished Bag Body (Including 3-Round Top Band): Approximately 10" to 11.5" wide × 12" tall (25.5–29 cm × 30.5 cm) (estimate)
- Shoulder Straps (Make 2):
1.25" wide × 22" long (3.2 × 56 cm)(estimate) (~10" / 25.5 cmshoulder drop) - Total Estimated Yarn Weight: ~190–225 g (6.7–8.0 oz) (estimate)
Materials & Tools Needed
- Yarn: Category 4 Medium Worsted-Weight 100% Cotton Yarn (such as Dishie, Lily Sugar'n Cream, or Lion Brand 24/7 Cotton) — 320–380 yards (290–350 m) total (estimate):
- Color A (Centers & Round 1–2 accents — e.g., Mustard Gold):
~45 yards (41 m)(estimate) - Color B (Round 2–3 accents — e.g., Terracotta):
~65 yards (60 m)(estimate) - Color C (Round 3–4 accents — e.g., Sage Green):
~75 yards (69 m)(estimate) - Main Color / MC (Round 5 outer border of all 8 squares + Seams + Top Band + 2 Straps — e.g., Natural Cream):
~150–195 yards (137–178 m)(estimate)
- Color A (Centers & Round 1–2 accents — e.g., Mustard Gold):
- Crochet Hook: 4.5 mm (US 7) for the squares and body; optional 4.0 mm (G-6) hook for tighter, non-stretch straps
- Notions: Blunt metal tapestry needle, locking stitch markers (4–8 for pinning corners during seaming), sharp scissors, and blocking pins/mat
- Optional Lining Supplies:
1/2 yard (0.5 m)of 100% cotton canvas or quilting cotton (or 1 pre-made10" × 12"plain cotton canvas tote bag for the fast no-machine lining hack), sewing pins, and matching thread
Why 100% Cotton Yarn Beats Acrylic for Bags: Standard 100% acrylic yarn has high elasticity—as soon as you load a wallet, keys, and a water bottle into an unlined acrylic tote, the bag can sag down to your knees. 100% cotton (or a cotton-linen blend) has minimal stretch, crisp stitch definition, and high abrasion resistance. For a deeper dive into load-bearing textures, check out our guide to the best bag stitches.
Abbreviations & Stitches Used (US Terms)
This pattern uses US crochet terminology.
Abbreviation | Stitch Name (US Terms) | Quick How-To |
|---|---|---|
ch | Chain | Yarn over, pull through loop on hook. |
sl st | Slip Stitch | Insert hook into stitch, yarn over, pull through both stitch and loop on hook in one motion. |
sc | Single Crochet | Insert hook into stitch, yarn over, pull up a loop (2 loops on hook), yarn over, pull through both loops. |
dc | Double Crochet | Yarn over, insert hook into stitch/space, yarn over, pull up a loop (3 loops on hook), |
granny cluster | 3-dc Cluster | A group of |
ch-sp | Chain Space | The open space underneath a |
BLO | Back Loop Only | Insert hook under only the back strand of the top |
RS / WS | Right Side / Wrong Side | Front-facing exterior surface vs. interior surface of the motif. |
Step-by-Step Pattern Instructions
Step 1: Crochet 8 Classic 5-Round Granny Squares
Work 8 identical 5-round motifs using our classic granny square construction. Using the same Main Color (Natural Cream) on Round 5 of every square frames your colorful centers and makes seaming invisible.
- Foundation Ring: Start with a magic ring (or
ch 4andsl stin first ch to form a ring). - Round 1:
Ch 3(counts as1 dcthroughout), work2 dcinto ring (first cluster made).[Ch 2, work 3 dc into ring]3 times,ch 2, join with asl stin top of beginningch-3. Pull ring tight. (4 clusters, four ch-2 corners; 12 dc total)- If keeping the same color:
Sl stin next2 dcand into thech-2corner space. - If changing color: Fasten off and join new color in any
ch-2corner space.
- If keeping the same color:
- Round 2:
Ch 3,(2 dc, ch 2, 3 dc)in samech-2corner space.[Ch 1, work (3 dc, ch 2, 3 dc) in next ch-2 corner space]3 times,ch 1, join withsl stin top of beginningch-3. (8 clusters; 24 dc total) - Round 3: Join or
sl stinto corner space.Ch 3,(2 dc, ch 2, 3 dc)in same corner space.*Ch 1, work 3 dc in next ch-1 side space, ch 1, work (3 dc, ch 2, 3 dc) in next ch-2 corner space; repeat from *2 more times,ch 1, work 3 dc in last ch-1 side space, ch 1, join withsl stin top of beginningch-3. (12 clusters; 36 dc total) - Round 4: Join or
sl stinto corner space.Ch 3,(2 dc, ch 2, 3 dc)in same corner space.*Ch 1, [work 3 dc in next ch-1 side space, ch 1] twice, work (3 dc, ch 2, 3 dc) in next ch-2 corner space; repeat from *2 more times,ch 1, [work 3 dc in next ch-1 side space, ch 1] twice, join withsl stin top of beginningch-3. (16 clusters; 48 dc total) - Round 5 (Main Color on All 8 Squares): Join Main Color in any corner space.
Ch 3,(2 dc, ch 2, 3 dc)in same corner space.*Ch 1, [work 3 dc in next ch-1 side space, ch 1] 3 times, work (3 dc, ch 2, 3 dc) in next ch-2 corner space; repeat from *2 more times,ch 1, [work 3 dc in next ch-1 side space, ch 1] 3 times, join withsl stin top of beginningch-3. Fasten off and weave in all inner color tails. (20 clusters per square: 15 dc + 3 ch-1 spaces along each side + ch-2 corners; 60 dc total per square)
Wet-Block or Steam-Block Your 8 Squares First: Before joining, pin all 8 squares to an exact 5" × 5" (12.5 × 12.5 cm) (estimate) square on a blocking mat, mist generously with water, and let dry. Blocking ensures every corner lines up stitch-for-stitch during assembly.
Step 2: Choose Your Joining Method & Assemble the Panels

4 Best Joining Methods for a Granny Square Bag
Choose one of these four techniques depending on whether you want a flat invisible seam or a textured grid border:

Joining Method | Tool Used | Visual Look on Right Side | Structure & Load Strength | How to Work It |
|---|---|---|---|---|
1. Whipstitch ( | Tapestry Needle | Neat, flat seam with a subtle horizontal chain outline | High | Hold 2 squares Right Sides ( |
2. Mattress Stitch | Tapestry Needle | 100% Invisible — squares melt seamlessly together | High | Lay 2 squares flat Right Sides ( |
3. Flat Slip-Stitch (Zipper) Join |
| Flat braided chain lying between the squares | Very High (Low Stretch) | Lay 2 squares Right Sides ( |
4. Single Crochet Join |
| Raised 3D decorative ridge framing every square (or flat inside seam if worked on | Maximum Rigidity | Hold 2 squares Wrong Sides ( |
Assembly Sequence (8-Square 2 × 2 Layout)
- Build the Front Panel (
2 × 2Grid): Lay 4 squares in a2 × 2square with Right Sides facing up. Join the top pair vertically down the center, join the bottom pair vertically down the center, and then join the horizontal seam across the middle. You now have a 10" × 10" (estimate) Front Panel with 40 stitches/spaces along each outer edge. - Build the Back Panel (
2 × 2Grid): Repeat with the remaining 4 squares to create an identical 10" × 10" (estimate) Back Panel. - Seam the 3 Outer Bag Edges: Place the Front Panel and Back Panel together (with Wrong Sides together if working a visible Single Crochet border, or Right Sides together if whipstitching on the inside and turning right-side out afterward). Pin the corners and center seams with locking stitch markers. Seam continuously down the left side edge, across the bottom edge, and up the right side edge, leaving the top edge open. Turn the bag Right Side out.
Step 3: Crochet the 3-Round Double Crochet Top Band
Adding a solid 3-round double crochet collar across the top opening unifies the squares, prevents the upper seam from splitting, and creates a dense anchor band for sewing on the straps and optional fabric lining.
- Round 1: With the Right Side facing you, join Main Color yarn with a
sl stat the right-hand side seam along the top opening.Ch 3(counts as firstdc). Work 1 dc in each dc, 1 dc in each ch-1 space, and 1 dc in each ch-2 corner space before and after the center vertical seam all the way around the top opening (approx. 80 dc total around—40 sts across the front panel and 40 sts across the back panel). Join with asl stto the top of the beginningch-3. - Round 2:
Ch 3(counts as1 dc), work1 dcin each stitch around (80 dc). Join with asl stto the top of the beginningch-3. - Round 3:
Ch 3(counts as1 dc), work1 dcin each stitch around (80 dc). Join with asl stto the top of the beginningch-3. Fasten off and weave in the end on the inside of the bag. (Your top band is now approximately1.75" to 2"tall (estimate).)
Step 4: Crochet & Reinforce the Two Non-Stretch Straps
Crocheted straps made of standard rows will stretch out unless you lock their side edges. Follow this two-part strap construction for comfortable, low-stretch handles:
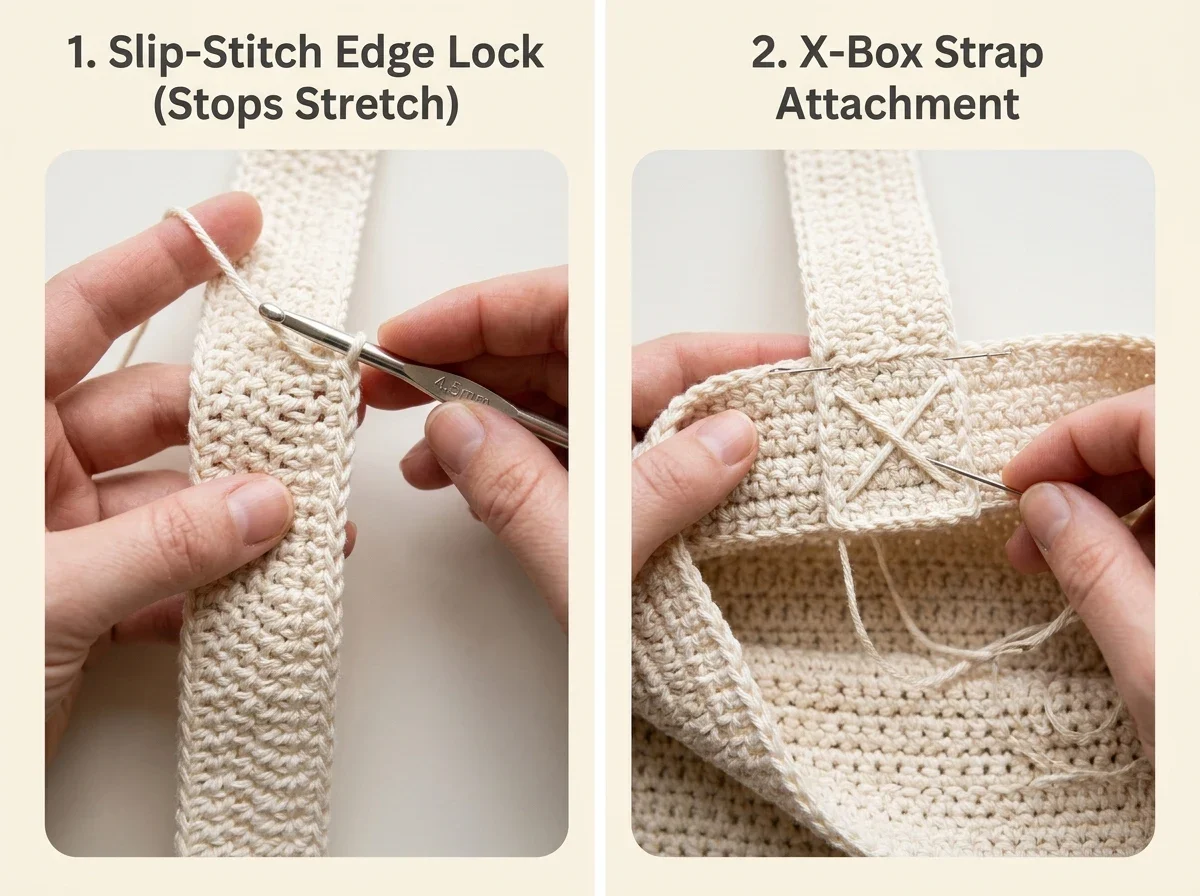
1. Crochet the Strap Base (Make 2)
Using Main Color cotton yarn and your 4.5 mm hook (or downsize to a 4.0 mm hook for extra firmness):
- Foundation:
Ch 7. - Row 1: Work
1 dcin the 4th ch from hook (skipped 3 chs count as firstdc) and1 dcin each of the next 3 chs across. (5 dc) - Rows 2–45:
Ch 3(counts as firstdc), turn, skip the first st at the base of thech-3, work1 dcin each of the next 3 dc, and1 dcin the top of the turningch-3. (5 dc per row) - Continue until the strap measures 22 inches (56 cm) long (estimate) (or adjust between
18"for a hand-carry tote and28"for an over-the-coat shoulder bag). Do not fasten off yet!
2. Add the Anti-Stretch Slip-Stitch Edge Lock
- After completing Row 45,
ch 1, rotate your strap 90 degrees to work down the long side edge, and work 2 tight slip stitches (sl st) around the side post of every double crochet row all the way down one long edge, across the bottom, and up the opposite long edge. - Fasten off, leaving a long 24-inch (60 cm) yarn tail at both ends for heavy-duty sewing. Because a slip stitch has almost zero vertical give, this edge lock acts like a woven stay-tape inside the strap!
3. Attach Straps with an X-Box Stitch
- Lay the bag flat and position the two ends of your first strap on the inside of the 3-round
dctop band, centered over the middle of the left-hand and right-hand granny squares (about2.25 inches / 5.7 cminward from the outer side seams). - Overlap the bottom 1.5 inches (3.8 cm) of each strap end behind the
dctop band and pin in place, checking that the strap is not twisted. - Thread the 24-inch yarn tail onto your tapestry needle and sew through the strap and the inner loops of the top band in a 1.25" × 1.5" square box, then stitch a diagonal
Xacross the center of the box. Repeat for all 4 strap ends.
Optional Step 5: How to Line Your Granny Square Tote Bag (2 Ways)
If you plan to carry small items like house keys, pens, headphones, or coins, adding a cotton lining stops small objects from poking through the granny cluster spaces and carries 100% of the bag's weight.

Method A: The 10-Minute No-Machine Hack (Pre-Made Canvas Tote)
Don't own a sewing machine? Buy an inexpensive blank 10" × 12" (or 12" × 14") 100% cotton canvas tote bag from a craft store:
- Cut off the canvas bag's handles (or leave them attached and crochet your
5 dcgranny straps right around them as a padded sleeve!). - Fold the top rim of the canvas bag outward (
Wrong Sideout) by1 inch (2.5 cm)so the raw edge is hidden. - Slide the canvas bag inside your crocheted granny square tote (Wrong Sides together), pin the folded canvas rim
3/8 inch (1 cm)below the top edge of your crocheteddcband, and whipstitch around the top by hand using heavy-duty thread or a single strand of split cotton yarn.
Method B: Custom Sewn Cotton Canvas Lining
- Measure & Cut: Lay your finished crochet bag flat and measure the width (
W ≈ 10.5") and height (H ≈ 12"). Cut 2 rectangles of cotton canvas or quilting cotton measuring[W + 1 inch]wide ×[H + 1.75 inches]tall (e.g.,11.5" × 13.75", estimate). - Sew the 3 Sides: Place the 2 fabric rectangles Right Sides together and sew down both sides and across the bottom using a
1/2 inch (1.2 cm)seam allowance, leaving the top open. Zigzag-stitch the raw edges so they cannot fray. - Press the Double-Fold Top Hem: Keep the fabric pouch Wrong Side out (so the raw seams face the outside of the pouch and will be hidden against the wrong side of the crochet bag). Fold the top raw edge down toward the outside by
3/8 inch (1 cm)and press with an iron, then fold down again by1 inch (2.5 cm)and press. - Insert & Stitch into the Bag: Slip the lining inside the crocheted bag (Wrong Sides together), tuck the strap ends between the crochet band and the canvas hem for maximum strength, pin around the top collar, and whipstitch by hand (or topstitch on a sewing machine using a longer
3.5 mmstitch length)3/8 inchbelow the top rim.
Multi-Size Granny Square Bag Layout Comparison
Want to make a smaller crossbody pouch or a larger farmers' market bag? Use this layout reference table (or calculate larger motif grids with our granny square calculator):
Bag Style & Layout | Number of | How Squares Are Arranged | Est. Finished Size ( | Est. Cotton Yardage ( |
|---|---|---|---|---|
Mini Crossbody Pouch | 2 Squares (or 2 large 7-round | 1 Front + 1 Back seamed on 3 sides |
|
|
3-Square Origami Shoulder Bag | 3 Large Squares ( | L-shape folded diagonally |
|
|
Classic 8-Square Tote (This Pattern) | 8 Squares ( |
|
|
|
13-Square Diamond Market Tote | 13 Squares ( | 5 Front + 5 Back + 2 folded Side Gussets + 1 Bottom |
|
|
18-Square Oversized Beach Tote | 18 Squares ( |
|
|
|
Common Mistakes & Troubleshooting
1. "My 8 granny squares are slightly different sizes and the middle seam looks crooked."
- Cause: Switching yarn brands between colors, or allowing your tension to loosen on Rounds 4 and 5.
- Fix: Always count your stitches on Round 5 (60 dc + four ch-2 corners + twelve ch-1 spaces per square) and wet-block all 8 squares to an identical
5" × 5"template before seaming. When joining the horizontal and vertical cross-seams, clip a locking stitch marker right through the center intersection where all 4 cornerch-2spaces meet so the crossroads cannot shift.
2. "The top band flares out wider than the body of the bag."
- Cause: Working too many double crochet stitches into the
ch-1side spaces or cornerch-2spaces on Round 1 of the top band. - Fix: On Round 1 of the top band, work only 1 dc into each dc and 1 dc into each ch-1 space (not 2 or 3). Across the center seam where two square corners meet, work
1 dcinto the first corner space and1 dcinto the second corner space (or work adc2togacross the two corner spaces) to keep the top opening crisp and trim.
3. "My granny squares twist slightly like a pinwheel after Round 4."
- Cause: Working all 5 rounds with the Right Side facing you causes crochet stitches' natural slight lean to accumulate into a vortex twist.
- Fix: Turn your square over at the end of every round (working Round 2 on the Wrong Side, Round 3 on the Right Side, etc.) so each round counter-balances the lean of the previous round.
Frequently Asked Questions (FAQ)
Can I make this granny square tote bag with leftover acrylic yarn?
Yes! If you want to use up colorful acrylic stash yarn for the 8 granny squares, you can still make a durable, non-sagging tote by using 100% cotton yarn for the Main Color (Round 5 border, seams, top band, and straps) or by adding a cotton canvas fabric lining to support the weight inside the bag.
How do I wash a crocheted granny square tote bag?
Turn the bag inside out, place it in a mesh laundry bag, and machine wash on a gentle cold cycle with mild detergent (or hand-wash in cool water if your colors are dark and unwashed). Reshape the bag flat on a dry towel and air-dry completely—never put a cotton granny square bag in a hot dryer, which can shrink the cotton lining and curl the straps.
Can I use leather or cotton webbing handles instead of crocheted straps?
Absolutely. Complete Steps 1 through 3 (8 squares + 3-round dc top band), skip Step 4, and attach a pair of 24- to 28-inch pre-made leather handles (using Chicago screws right through the dc top band) or sew 1.25-inch cotton webbing straps directly to the interior collar.
How can I add a button closure to the top of my tote bag?
On Round 3 of the double crochet top band, stop at the center stitch of the Back Panel, ch 14 (or enough chains to loop around a 1-inch / 25 mm wooden toggle button), and sl st back into the same stitch before continuing dc around. Sew a large wooden button centered on the Front Panel top band.



Questions & notes
No comments yet
Sign in or create a free account to comment under your profile and keep track of your replies.
Your email address is never published. Comments are moderated under our Community Guidelines; see our Privacy Policy for how we use your details.