Linked Double Crochet Pot Holder Crochet Pattern
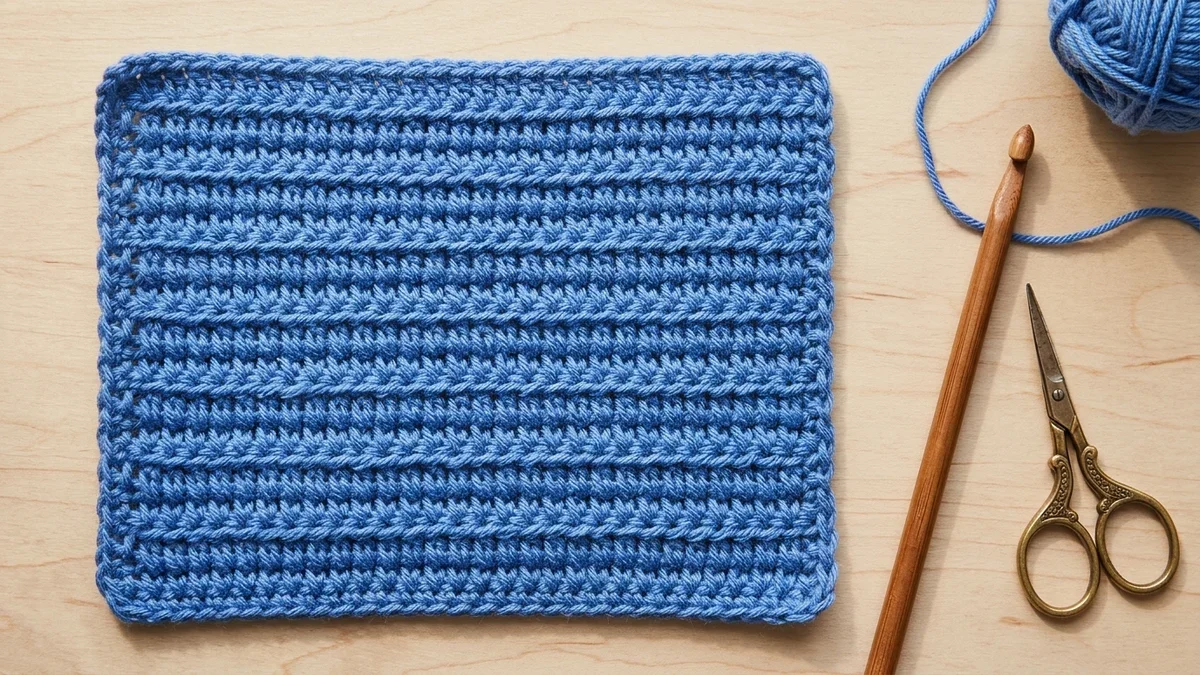
A dense, gap-free square in linked double crochet. Make two and join them for a thick pot holder, or use one as a trivet.

12 min read

Pattern at a glance
- Hook
- 5.0 mm (US H-8)
- Yarn
- 100% cotton worsted-weight yarn
- Terms
- US terms
Materials
- 100% cotton worsted-weight (#4) yarnUse cotton, not acrylic: acrylic can melt against a hot pan
- 5.0 mm (US H-8) crochet hookOr the size on your yarn label
- Tapestry needleFor joining and weaving in ends
Abbreviations
- ch
- chain
- dc
- double crochet
- ldc
- linked double crochet
- st(s)
- stitch(es)
This linked double crochet pot holder pattern creates a dense, gap-free square worked in flat rows of linked double crochet (ldc) using 100% worsted-weight cotton yarn. Unlike standard double crochet (UK treble crochet)—which leaves vertical spaces between stitch posts where a hot pan handle can touch your fingers—linked double crochet locks every stitch horizontally to its neighbor, forming a solid thermal barrier. Crochet a single square for a tabletop trivet, or make two matching squares and join them around the edges with a single crochet border for a double-thick oven pot holder.
This pattern is written in US crochet terms (where US double crochet dc corresponds to UK treble crochet tr, and US single crochet sc corresponds to UK double crochet dc).
Pattern At a Glance & Skill Notes
Specification | Details |
|---|---|
Skill Level | Easy / Confident Beginner (flat rows, no shaping; requires picking up horizontal bars) |
Construction | Worked flat in turned rows ( |
Finished Size | Approx. |
Recommended Yarn | 100% unmercerized worsted-weight (#4 Medium) kitchen cotton (never acrylic or synthetic blends) |
Estimated Yardage | ~65–75 yds ( |
Recommended Hook |
|
Why Linked Double Crochet Works for Pot Holders

In a standard double crochet row, you wrap the yarn over your hook freely before inserting it into the next stitch, leaving a narrow vertical window between every pair of posts. In linked double crochet (ldc), that initial yarn-over is replaced by inserting your hook downward under the horizontal middle bar of the stitch you just finished and pulling up a loop. Every stitch is physically anchored at its midpoint to the stitch beside it, creating a flat, woven-like fabric with zero daylight holes.
Materials and Gauge
Materials Needed
- Yarn: 100% Worsted-Weight (#4 Medium) Kitchen Cotton Yarn (such as Lily Sugar 'n Cream, WeCrochet Dishie, or Premier Home Cotton — ensure 100% cotton content with zero polyester/acrylic).
- Single-Layer Trivet (1 Panel + Border): Approx. 1.5 oz / 43 g (~75 yds / 69 m) (estimate).
- Double-Thick Pot Holder (2 Panels + Joining Border): Approx. 3.0 oz / 85 g (~150 yds / 137 m), or two contrasting 50 g balls (estimate). If you are working from partial skeins or changing yarn weights, check your total against our yarn yardage tool.
- Crochet Hook:
5.0 mm (US H-8)aluminum or ergonomic hook (drop to4.5 mmif any light shows between your stitches). - Notions: Metal tapestry needle (blunt tip, #16) for weaving in cotton tails, locking stitch markers (optional for marking the first and last stitch of each row), and scissors.
Gauge
- Target Gauge:
13 ldc sts × 7 rows = 4" × 4" (10 cm × 10 cm)worked flat with a 5.0 mm hook (estimate). - Exact gauge is not critical for fit, but your fabric must be dense and firm with no gaps between stitch posts when bent over your fingers.
Critical Heat-Safety Note: Why You Must Use 100% Cotton (Never Acrylic)

- Never use acrylic, polyester, nylon, or synthetic blends: Acrylic is a petroleum-based plastic fiber (
polyacrylonitrile). When exposed to a hot baking sheet, cast-iron skillet, or oven rack (typically 350°F–450°F / 175°C–230°C), acrylic softens and melts above ~300°F (150°C), fusing to cookware and causing severe contact burns. Even an "85% cotton / 15% polyester" recycled blend can scorch or slicken under high heat. - Choose unmercerized 100% cotton (or 100% non-superwash wool): Unmercerized 100% kitchen cotton has a matte, high-friction surface that grips baking dishes without slipping, withstands high dry heat without melting, and can be tossed straight into the washing machine.
- Never use a damp pot holder on hot cookware: Water conducts heat rapidly and flashes into scalding steam on contact with a hot pan. Always let freshly washed cotton pot holders dry completely before using them near the stove or oven.
Stitches and Abbreviations (US Terms)
ch— chainsl st— slip stitchsc— single crochet (UK: double crochetdc)dc— double crochet (UK: treble crochettr)ldc— linked double crochet (see step-by-step stitch guide below)st(s)— stitch(es)yo— yarn overRS/WS— Right Side / Wrong Side
How to Work the Linked Double Crochet (ldc)

- First
ldcof Row 1 (Worked into the Starting Chain):- Insert your hook into the 2nd chain from your hook,
yo, and pull up a loop (2 loops on hook). - Insert your hook into the 4th chain from your hook,
yo, and pull up a loop (3 loops on hook). Yoand pull through 2 loops (2 loops remain on hook);yoand pull through the remaining 2 loops. (Your first linked double crochet is complete; the skipped chains and first stitch are linked together.)
- Insert your hook into the 2nd chain from your hook,
- First
ldcof Row 2 and All Following Rows:- After chaining 2 and turning (
ch 2does not count as a stitch—it serves as the linked side edge), insert your hook into the 2nd chain from your hook,yo, and pull up a loop (2 loops on hook). - Insert your hook under both top loops of the very first stitch at the base of the turning chain,
yo, and pull up a loop (3 loops on hook). Yo, pull through 2 loops;yo, pull through the last 2 loops.
- After chaining 2 and turning (
- Standard
ldcAcross the Row (Every Stitch After the First):- Look at the vertical post of the stitch you just completed and locate the single horizontal bar running across the middle of its post.
- Insert your hook from top to bottom under that horizontal bar,
yo, and pull up a loop (2 loops on hook). - Insert your hook under both top loops of the next stitch in the row below,
yo, and pull up a loop (3 loops on hook). Yo, pull through 2 loops;yo, pull through the remaining 2 loops.
Pattern Notes
- Construction Options:
- Single-Layer Trivet: Make 1 square panel, then work the single crochet border and hanging loop around all four edges. Ideal for resting warm serving dishes on a dining table.
- Double-Thick Oven Pot Holder (Recommended for Hot Pans): Make 2 identical square panels (either in matching yarn or two contrasting colors like terracotta and cream). Hold the two panels wrong-sides together and work the single crochet border through both layers at once to fuse them into a double-thick pad.
- Turning Chain Rule: The
ch 2at the beginning of each row is used to anchor the first linked stitch and does not count as a separate stitch in the row count. Every row has 24ldcstitches. - Custom Width Formula: Because Row 1 begins in the 2nd and 3rd chains from the hook, your foundation chain is always your desired stitch count + 2 extra chains (
24 + 2 = 26 chains).
Step-by-Step Instructions
Part 1: Linked Double Crochet Square Panel (Make 1 for Trivet, or Make 2 for Double-Thick Pot Holder)
Foundation Chain: With 100% worsted cotton yarn and a 5.0 mm (H-8) hook, ch 26.
- Row 1 (RS): Work the first
ldcusing the starting chain: insert hook into 2nd ch from hook,yoand pull up a loop (2 loops on hook); insert hook into 3rd ch from hook,yoand pull up a loop (3 loops on hook);[yo, pull through 2 loops]twice (firstldcmade). Work 1ldcin each of the remaining 23 chains across (inserting hook under the horizontal bar of the previousldc, pulling up a loop, then inserting into the next ch and completing as adc). Turn. — 24 ldc (Math check: 3rd ch from hook + 23 remaining chs = 24 base chs used after the 2 skipped setup chains; 1st ldc + 23 ldc = 24 ldc total). - Row 2 (WS): Ch 2 (does not count as a st). Insert hook into 2nd ch from hook,
yoand pull up a loop; insert hook under both top loops of the first st,yoand pull up a loop;[yo, pull through 2 loops]twice (firstldcmade). Work 1ldcin each of the remaining 23 sts across. Turn. — 24 ldc - Rows 3–12: Repeat Row 2 ten more times until your square has 12 completed rows (or until the height equals the width of your panel).
- If making a 1-layer trivet: Do not fasten off at the end of Row 12; proceed directly to Part 2 (Border & Hanging Loop).
- If making a 2-layer pot holder: Fasten off the first panel at the end of Row 12 and weave its tails into the inside face. Crochet the second panel through Row 12, and do not fasten off the second panel—use its live loop to join both panels in Part 2.
Finishing: Double-Layer Seaming Border & Hanging Loop

- Align the Panels (For 2-Layer Pot Holder): Place your two completed 12-row squares on top of each other with their Right Sides (
RS) facing outward and all four edges aligned so Row 1 matches Row 1 and Row 12 matches Row 12. (Ensure any woven yarn tails are tucked safely inside between the two layers.) - Joining Border Round (
Rnd 1):- Continuing with the live loop at the top corner of Row 12, ch 1 (does not count as a st).
- Insert your hook through both panels at the same time (going under both top loops of the front panel and the matching loops of the back panel) and work 1
scin each of the 24 stitches across the top edge. - Corner 1: Work 3
scinto the corner stitch/space through both layers to turn the corner flat without curling. - First Row-End Side Edge: Work 24
scevenly down the side edge through both panels (2scperldcrow-end across 12 rows =12 × 2 = 24 sc). - Corner 2: Work 3
scinto the bottom corner through both layers. - Bottom Foundation Edge: Work 1
scin each of the 24 foundation chain loops across the bottom edge through both layers. - Corner 3: Work 3
scinto the second bottom corner through both layers. - Second Row-End Side Edge: Work 24
scevenly up the second side edge through both panels (2 scper row-end across 12 rows).
- Corner 4 & Sturdy Hanging Loop:
- Work 2
scinto the final corner space where you started the round. - Ch 12 to form the hanging loop, then work 1
scback into that same corner space to anchor the loop. - (Optional Extra-Sturdy Loop): If you want a rigid hanging ring that won't stretch on wide kitchen hooks, turn slightly and work 14
scdirectly into the center of thech-12loop, thensl stinto the firstscof the border round. - Otherwise, join with a
sl stto the firstscof the border round. (Total border stitch count:4 sides × 24 sc = 96 side sc+4 corners × 3 sc = 12 corner sc= 108scaround, plus thech-12hanging loop.)
- Work 2
- Fasten Off & Weave In: Cut the yarn leaving a 6-inch (15 cm) tail, pull through the last loop, and use your metal tapestry needle to weave the tail back and forth three times between the two cotton layers so no tail is visible on the outside.
Variations (Size, Colorwork, and Borders)
1. Three Custom Sizes (With Starting Chain & Row Math)
Because linked double crochet in worsted cotton works up at roughly 3.25 stitches per inch and 1.75 rows per inch, you can resize the square using the Desired Stitches + 2 chain formula:
Project Size | Target Dimensions (estimate) | Starting Chain | Stitches Per Row | Rows Per Panel | Est. Total Cotton (2 Layers) (estimate) |
|---|---|---|---|---|---|
Mini / Coaster / Pan Handle Grabber |
| Ch 20 | 18 | 10 rows | ~95 yds (87 m) |
Standard Oven Pot Holder (Pattern Size) |
| Ch 26 | 24 | 12 rows | ~150 yds (137 m) |
Large Casserole Hot Pad / Trivet |
| Ch 32 | 30 | 15 rows | ~220 yds (201 m) |
2. Two-Tone Reversible Color Block
Crochet Panel A in a dark, stain-hiding shade (such as terracotta, charcoal, or sage green) and Panel B in natural unbleached cream. When you work the single crochet joining border in the darker color, it frames the cream side with a crisp contrasting piping line while giving you a dark utility side for cast-iron skillets.
3. Crab Stitch (Reverse Single Crochet) Corded Edge
After completing the standard single crochet joining round (Rnd 1), do not fasten off. Instead, ch 1 and work 1 round of reverse single crochet (crab stitch) from left to right into each sc around. This adds a thick, twisted rope bumper around the perimeter that protects table surfaces from heavy Dutch ovens.
Troubleshooting Common Linked Double Crochet Pot Holder Issues
Problem / Symptom | Why It Happens | How to Fix It |
|---|---|---|
Left edge of the square slants inward (losing stitches) | Missing the final stitch of the row, which sits snugly against the previous row's | Count your top Vs at the end of every row to verify you have 24 |
Small hole appears at the beginning of each row | Working the first stitch as a regular | Always start every row by inserting your hook into the 2nd chain from hook of your turning |
Single panel curls slightly inward along the row edges | Linked stitches pull neighboring posts together horizontally, creating slight inward tension on unblocked cotton. | Steam-block or wet-block the panels flat, or simply seam two panels Wrong-Sides together—their opposing row tensions cancel each other out so the double-thick pad lies completely flat. |
Border waves or ruffles along the side edges | Working 3 or more single crochets into the side of each | Stick strictly to 2 |
Frequently Asked Questions
Why is linked double crochet better than regular double crochet for a pot holder?
Regular double crochet (dc) posts are only connected at the top and bottom loops, leaving vertical gaps between stitches where a hot pan or oven rack can burn your skin. Linked double crochet (ldc) connects every stitch post horizontally through its center bar, eliminating gaps and creating a solid, dense heat shield.
Can I use acrylic yarn if I make the pot holder two layers thick?
No. Never use acrylic, polyester, or nylon yarn for pot holders, even in multiple layers. Acrylic is a plastic fiber that softens and melts above roughly 300°F (150°C), which can fuse hot plastic onto your hands or cookware. Always use 100% cotton (or 100% non-superwash wool) for kitchen heat protection.
Should I use mercerized or unmercerized cotton yarn for pot holders?
Unmercerized 100% kitchen cotton (such as Lily Sugar 'n Cream or WeCrochet Dishie) is best for everyday oven pot holders because its matte, lofty plies trap more insulating air and grip slick baking dishes without sliding. Mercerized cotton (like Lion Brand 24/7 Cotton) has a sleeker, shinier finish that works well for decorative table trivets, though it is slightly less grippy on glass casserole pans.
Is one panel of linked double crochet thick enough to use for hot pans?
A single layer of linked double crochet is thick enough to use as a tabletop trivet under warm serving bowls or teapots, but for taking hot pans out of a 350°F–450°F (175°C–230°C) oven, you should always crochet two panels and seam them together (or insert a layer of insulated thermal batting such as Insul-Bright between the two cotton squares before crocheting the border closed).
How do I wash and dry a 100% cotton crochet pot holder?
Machine wash in cold or warm water on a gentle cycle with mild detergent, reshape the square flat while damp, and air-dry flat (or tumble dry on low heat). Avoid high-heat dryer cycles, which can shrink unmercerized 100% cotton by 5–10%, and always make sure the pot holder is 100% dry before using it on hot cookware.
About the Author
Claire Vance is a crochet pattern designer, technical editor, and fiber educator at DoubleCrochet.io. She specializes in functional home patterns, stitch mechanics, and Craft Yarn Council-compliant pattern grading.



Questions & notes
No comments yet
Sign in or create a free account to comment under your profile and keep track of your replies.
Your email address is never published. Comments are moderated under our Community Guidelines; see our Privacy Policy for how we use your details.