Herringbone Double Crochet (HBdc) Tutorial: Step-by-Step Guide to Modern Slanted Texture
A double crochet with one slip-through step that tilts each post into a woven, herringbone texture.

11 min read
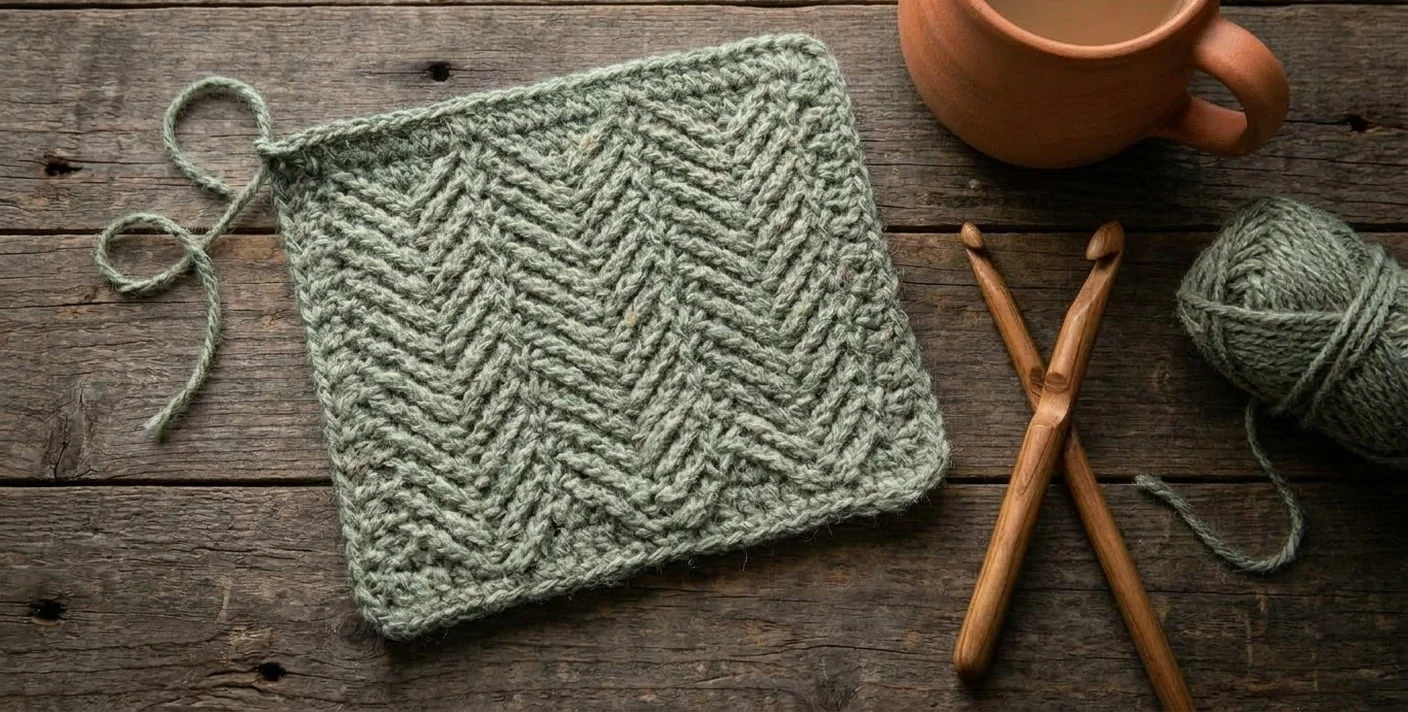
Stitch at a glance
- US terms
- Herringbone double crochet
HBdc - UK terms
- Herringbone treble crochet
HBtr
Standard double crochet is a workhorse stitch, but its strictly vertical posts can sometimes look a little traditional or blocky when you are aiming for a sleek, contemporary aesthetic. When you want a fabric that looks almost woven—with rows that lean in gentle, alternating 45-degree chevrons like a tailored tweed jacket—the Herringbone Double Crochet (abbreviated HBdc) is one of the most rewarding stitches you can put on your hook.
What makes Herringbone Double Crochet so popular among modern garment and home-decor designers is that it uses the exact same basic ingredients as a regular double crochet (1 yarn-over and 3 loops on the hook), with just a tiny shift in how you pull those loops through. Instead of pulling through two loops twice, you slip the newly drawn loop directly through the first loop on your hook before finishing the stitch.
In this tutorial, we will walk step by step through the Herringbone Double Crochet motion, explain why working HBdc in turned rows creates a true zigzag herringbone while working in the round creates a continuous diagonal spiral, and calculate how to adjust your row counts for its slightly denser vertical gauge.
US vs. UK Terminology Note
In US crochet terminology, this stitch is called Herringbone Double Crochet (HBdc). In UK crochet terminology, where a US double crochet is a treble crochet, it is called Herringbone Treble Crochet (HBtr). (For a complete side-by-side terminology table, check our US vs. UK Crochet Terms Guide.)
How Herringbone Double Crochet Creates Its Signature Slant
To understand why Herringbone Double Crochet leans sideways while a standard double crochet stands straight up, compare what happens to the initial yarn-over in both stitches:
- In a Standard Double Crochet: You yarn over, insert your hook into the stitch, yarn over, and pull up a loop (
3 loops on hook). Next, you yarn over and pull through 2 loops. That extra yarn-over gives the initial wrap room to stand vertically inside the post. - In a Herringbone Double Crochet: You yarn over, insert your hook into the stitch, yarn over, and pull a loop through the stitch and immediately continue pulling that same loop straight through the first loop (the yarn-over) on your hook (
2 loops remain on hook).
As detailed in stitch guides by Dora Does and Daisy Farm Crafts, slipping that pulled-up loop directly through the yarn-over anchors the yarn-over down at a 45-degree angle toward the base of the stitch! Then, when you yarn over and pull through 1 loop to build height, and finally yarn over and pull through 2 loops to cap the stitch, the post locks in that crisp diagonal tilt.
Step-by-Step Tutorial: How to Crochet the HBdc Stitch
Herringbone Double Crochet works over any number of stitches (there is no multi-stitch repeat to memorize!). For a flat practice swatch, chain any number—let us use Chain 18 to yield 16 stitches per row.

Step-by-Step Instructions for One HBdc Stitch
- Yarn Over and Insert Hook: Wrap the working yarn over your hook, then insert your hook into the target stitch (on Row 1, start in the 3rd or 4th chain from your hook depending on whether your turning chain counts as a stitch).
- Pull Through the Stitch AND the First Loop on the Hook (The Slip Step): Yarn over, pull a loop through the stitch (
3 loops momentarily on hook), and in one fluid motion, keep pulling that loop straight through the next loop on your hook (the initial yarn-over). You now have 2 loops remaining on your hook, and you will see a small diagonal bar leaning across the bottom of the stitch.- Ergonomic Tip: Slightly rotate your hook tip downward toward the fabric as you slide through that first yarn-over loop so the hook lip does not catch.
- Yarn Over and Pull Through 1 Loop (The Height Step): Yarn over and pull through only the first loop on your hook. You still have 2 loops on your hook, and the stitch post has now risen to nearly full double crochet height.
- Yarn Over and Pull Through Both Loops (The Closing Step): Yarn over and pull through the remaining 2 loops on your hook (
1 working loop remains). Your Herringbone Double Crochet is complete!
Practicing Row 1 and Row 2
- Row 1: Ch 18. Work 1 HBdc in the 4th ch from hook (skipped 3 chs count as first st) and in each ch across. Turn. (
16 sts) - Row 2: Ch 3 (or work a Stacked Single Crochet), skip first st, work 1 HBdc in the next st and in each st across, working the final HBdc into the top of the turning chain. Turn. (
16 sts)
Working HBdc Flat (Turned Rows) vs. In the Round: A Visual Difference
One of the most important design considerations with Herringbone Double Crochet is how turning your work changes the visual pattern:
- Worked Flat in Turned Rows (True Herringbone Zigzag):
When you crochet from right to left on Row 1, every stitch leans slightly to the right (or left). When you turn your work at the end of the row and crochet back across on Row 2, the stitches lean in the opposite direction when viewed from the front! Alternating right-leaning and left-leaning rows creates the classic woven chevron "fishbone" (herringbone) pattern on both sides of the fabric. - Worked in Unturned Rounds (Continuous Diagonal Spiral):
If you work HBdc in continuous or joined rounds without turning at the end of each round (for example, on a hat or cowl), every single round leans in the same direction. Instead of a zigzag chevron, you get a sleek diagonal spiral texture.- How to Get the True Herringbone Zigzag in the Round: Simply join each round with a slip stitch, chain 2 or 3, and TURN your work at the end of every round! Turning after each joined round restores the alternating left-right herringbone chevrons on cowls, bags, and seamless sweater bodies.
Gauge & Row Height Comparison: Standard DC vs. HBdc (Worked Math)
Because Step 2 of the HBdc slips the loop directly through the initial yarn-over instead of adding an extra yarn-over wrap, a Herringbone Double Crochet stitch is slightly shorter and denser vertically than a standard US double crochet—sitting right between a Half Double Crochet (hdc) and a Standard Double Crochet (dc).
Let us look at an illustrative comparison in Category 4 Medium Worsted yarn with a 5.5 mm (US I-9) hook. The gauges are typical example values; always swatch your own:
Stitch Type (Worsted Yarn, 5.5 mm Hook) | Horizontal Stitch Gauge (per 4 in) | Vertical Row Gauge (per 4 in) | Average Row Height | Rows Needed for a 60-Inch Blanket/Scarf |
|---|---|---|---|---|
Half Double Crochet ( | 14.5 sts / 4 in | 10.5 rows / 4 in | 0.381 in (9.7 mm) | 158 rows |
Herringbone Double Crochet ( | 14.0 sts / 4 in | 9.0 rows / 4 in | 0.444 in (11.3 mm) | 135 rows |
Standard Double Crochet ( | 14.0 sts / 4 in | 8.0 rows / 4 in | 0.500 in (12.7 mm) | 120 rows |
Worked Example: Planning an HBdc Scarf with Calculators
Suppose you want to crochet a cozy winter scarf measuring 8 inches wide by 65 inches long in Category 4 Worsted yarn using HBdc (which you can model directly in our Crochet Gauge Calculator).
- Horizontal Stitches (14 sts ÷ 4 in = 3.5 sts/in): Width Stitches = 8 in × 3.5 sts/in = 28 HBdc stitches per row
Using our Foundation Chain Calculator, if you start with a standard chain wherech 3counts as the first stitch, you chain 28 + 2 = 30 chains. - Vertical Rows (9.0 rows ÷ 4 in = 2.25 rows/in): Total Scarf Rows = 65 in × 2.25 rows/in = 146.25 → 146 rows
Notice that if you had used standard double crochet row math (2.0 rows/in × 65 in = 130 rows), your HBdc scarf would have stopped at 57.8 inches—more than 7 inches shorter than planned!
How to Keep Straight Edges and Increase/Decrease in HBdc
Turning Chains for HBdc
Because an HBdc stitch is slightly shorter than a regular double crochet (0.44 in vs. 0.50 in), a traditional ch 3 turning chain is almost always too tall and bows outward into a bump on the side of your work.
- Best Turning Option: Use a
ch 2(either counted as the first stitch or uncounted with the first HBdc worked into the very first stitch), or work a slightly compact Stacked Single Crochet.
Increasing and Decreasing in HBdc
- HBdc Increase (
2 HBdc in same st): Simply work two complete HBdc stitches into the same base stitch. - HBdc Decrease (
HBdc2togacross 2 stitches):- Yarn over, insert hook into the first stitch, yarn over, pull through the stitch and the first loop on the hook (
2 loops on hook), then yarn over and pull through 1 loop (2 loops remain on hook—leave unfinished). - Yarn over, insert hook into the next stitch, yarn over, pull through the stitch and the next loop on the hook (
3 loops on hook), then yarn over and pull through 1 loop (3 loops on hook). - Yarn over and pull through all 3 remaining loops on the hook to close the decrease cleanly.
- Yarn over, insert hook into the first stitch, yarn over, pull through the stitch and the first loop on the hook (
Best Yarns and Projects for Showcasing Herringbone Texture
Texture works best when paired with clean fiber definition:
- Best Yarn Choices: Smooth, multi-plied yarns in solid, heather, or tonal colorways—such as 100% cotton (for dishcloths and summer totes), merino wool, or anti-pilling acrylic. The smooth ply makes the 45-degree diagonal bars pop visually.
- Yarns to Skip: Avoid busy, short-repeat variegated yarns or super-fluffy eyelash/bouclé yarns; chaotic color pooling hides the subtle herringbone chevrons.
- Top Project Ideas: Modern throw blankets (like Make & Do Crew's beginner HBdc throw), structured pillow covers, reversible scarves, and thermal pot holders.
Common Mistakes and How to Fix Them
1. Accidentally Working Herringbone Half Double Crochet (HBhdc)
- Why It Happens: After pulling the loop through the stitch and through the first loop on the hook (leaving 2 loops on the hook), it is very tempting to yarn over and pull through both remaining loops right away.
- The Result: If you skip Step 3 (
yo, pull through 1 loop), you have actually made a Herringbone Half Double Crochet (HBhdc)! WhileHBhdcis also a lovely stitch, it is much shorter and denser thanHBdc. - The Fix: Repeat the mantra in your head as you stitch: "Slip one, pull through one, pull through two."
2. Hook Catching on the Slip-Through Step
- Why It Happens: If you hold your initial yarn-over tightly on the hook and keep the hook lip facing straight up (12 o'clock), the lip will snag on the yarn-over when you try to slide the pulled-up loop through it.
- The Fix: Rotate your hook tip slightly downward (toward 6 o'clock, facing the stitch base) as you draw the loop through both the stitch and the initial yarn-over. It will glide through effortlessly.
Frequently Asked Questions
Is Herringbone Double Crochet completely reversible?
Yes! When worked in flat turned rows, both sides of the fabric look identical—displaying neat, alternating diagonal ridges. That makes HBdc an outstanding choice for scarves, blankets, and shawl wraps where both sides of the fabric are visible during use.
Does HBdc use more yarn than standard double crochet?
Per square foot of finished fabric, HBdc usually uses a little more yarn than standard double crochet, because it takes about 9 rows instead of 8 rows to cover 4 vertical inches. Always add a 10% safety buffer when substituting HBdc into a standard double crochet blanket pattern.
Can I work Herringbone Double Crochet into the Back Loop Only (BLO)?
Yes—working HBdc in the Back Loop Only (BLO HBdc) adds a sharp horizontal ridge beneath the slanted bars, creating an ultra-plush, deeply corrugated fabric that looks remarkably like brioche knitting.
Does HBdc drape well for sweaters and cardigans?
HBdc has more body and structure than standard double crochet, making it wonderful for structured jacket-style cardigans, collars, and vests. For a looser, more fluid sweater drape, go up 0.5 mm in hook size above the yarn label recommendation.
Conclusion and Next Steps
Herringbone Double Crochet proves that you do not need complicated multi-row cable charts to create sophisticated, modern crochet fabric. By adding a simple slip-through motion at the base of each stitch, you transform everyday double crochet into a dense, reversible chevron weave that looks right at home in contemporary interiors and wardrobes.
Ready to plan a project in Herringbone Double Crochet?
- Calculate your exact stitch and row requirements with our Crochet Gauge Calculator.
- Find your starting chain count in seconds with the Foundation Chain Calculator.
- Discover more texture in our tutorial on Front Post and Back Post Double Crochet Ribbing.


Questions & notes
No comments yet
Sign in or create a free account to comment under your profile and keep track of your replies.
Your email address is never published. Comments are moderated under our Community Guidelines; see our Privacy Policy for how we use your details.