Easy Double Crochet Slouch Beanie Pattern (Flat Rectangle)
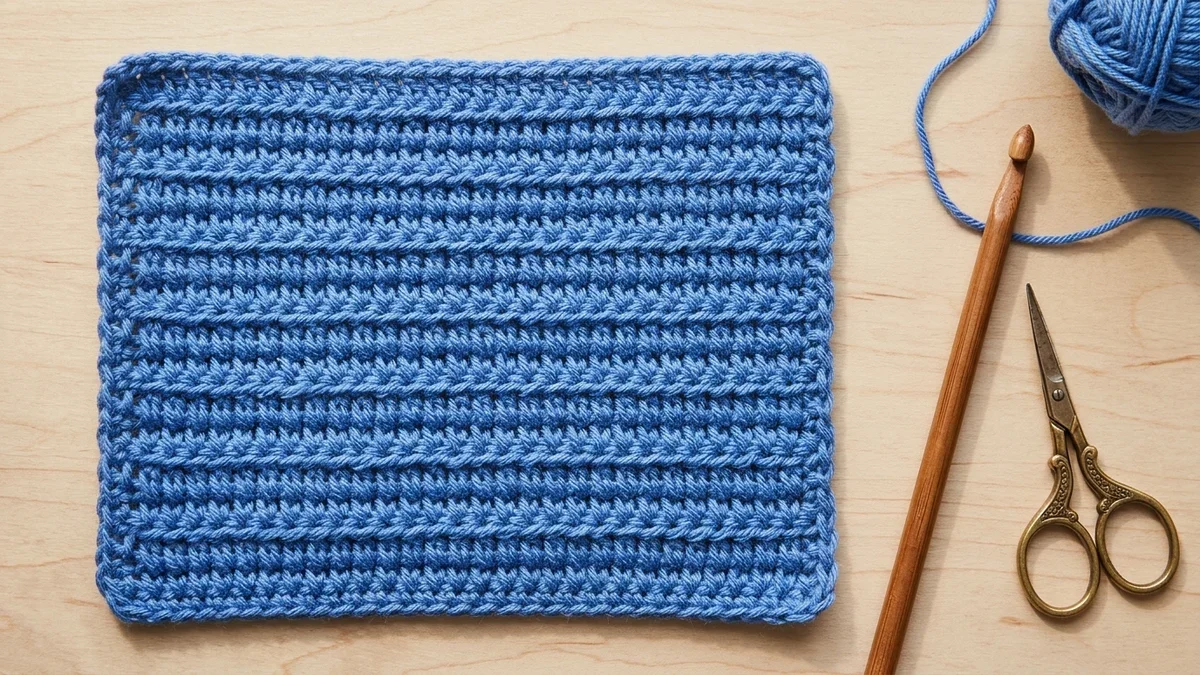
A ribbed slouch beanie worked flat as a simple rectangle in back-loop double crochet, then seamed and gathered. Six sizes, bulky or worsted yarn.

11 min read

Pattern at a glance
- Hook
- 8.0 mm (US L-11) for bulky; 5.5 mm (US I-9) for worsted
- Yarn
- 1 skein: 130–160 yd of CYC #5 bulky, or 190–230 yd of CYC #4 worsted (adult sizes)
- Finished size
- Six sizes, newborn to adult large (head 13–23.5 in / 33–59.5 cm)
- Gauge
- Bulky: 8 sts × 6 rows = 4 in (10 cm); worsted: 14 sts × 8 rows = 4 in; in BLO dc, unstretched
- Terms
- US terms
Materials
- YarnCYC #5 bulky (130–160 yd) or CYC #4 worsted (190–230 yd)
- Crochet hook8.0 mm (US L-11) for bulky or 5.5 mm (US I-9) for worsted
- Notions2 locking stitch markers, blunt tapestry needle, scissors
- Pom-pom (optional)Snap-on faux fur
Abbreviations
- ch
- chain
- dc
- double crochet
- BLO
- back loop only
- sl st
- slip stitch
- st(s)
- stitch(es)
- RS / WS
- right side / wrong side
You can crochet this easy double crochet slouch beanie from a single flat rectangle—no increasing in the round, no crown math, and no magic ring required. You simply work rows of Back Loop Only double crochet (dc BLO) sideways until the rectangle wraps comfortably around the head, seam the two short ends into a tube, and cinch one open end closed with your yarn tail. Below you will find complete instructions for both Bulky (#5) and Worsted (#4) yarn across six sizes from Newborn to Adult Large.
Terminology note: This pattern uses standard US crochet terms throughout. In UK crochet terminology, a US double crochet (dc) is called a treble crochet (tr), and a US single crochet (sc) is called a double crochet (dc).
At-a-Glance Pattern Summary
- Skill Level: Confident Beginner (only chains, double crochet in the back loop, and basic seaming)
- Construction: Flat rectangle worked sideways, seamed into a tube, and gathered at the crown
- Sizes Included: 6 sizes — Newborn, Baby (3–6 mos), Toddler (1–3 yrs), Child (4–10 yrs), Adult Small/Medium, and Adult Large
- Yarn Options:
- Option A (Bulky #5): 105–185 yds (96–169 m) (estimate)
- Option B (Worsted #4): 130–230 yds (119–210 m) (estimate)
- Hook Sizes:
- Option A (Bulky #5): 6.5 mm (US K-10.5) crochet hook (or size needed to obtain gauge)
- Option B (Worsted #4): 5.5 mm (US I-9) crochet hook (or size needed to obtain gauge)
- Estimated Making Time: Approximately 60 to 90 minutes in Bulky (#5) yarn for an experienced crocheter (or 2 to 3 hours for a beginner); approximately 2 to 3.5 hours in Worsted (#4) yarn.
How the Flat Rectangle Beanie Construction Works
Most traditional hat patterns are worked from the top down in joined rounds, requiring precise crown increase counts on every round. If your gauge is slightly off, a top-down hat ends up either too tight or floppy like a bowl.

Working a beanie from a sideways flat rectangle solves that problem:
- Your foundation chain sets the total height of the hat (from the top of the crown down to the bottom of the unfolded brim, including a 2-inch fold-up cuff).
- Your row count sets the circumference of the hat around the head. Because you work the rows sideways, the vertical ridges created by BLO ribbing run vertically from crown to brim—giving the hat knit-like horizontal stretch.
- You can test the fit before seaming: Wrap the flat rectangle around your head as you crochet, and stop adding rows as soon as it reaches a comfortable, snug stretch.
Understanding Negative Ease & Craft Yarn Council Head Sizes
Because back-loop-only double crochet ribbing stretches horizontally by roughly 2 to 3 inches when worn, your flat rectangle must be narrower than the wearer's actual head circumference. This intentional reduction is called negative ease.

According to the Craft Yarn Council Standard Head Circumference Chart, standard head measurements range from 13–14 inches for newborns up to 22–23.5 inches for large adults. For a secure, non-slipping fit in dc BLO ribbing, subtract 1.5 to 2.5 inches (4 to 6.5 cm) of negative ease from the actual head circumference to find your target unstretched rectangle length. If you want to calculate custom dimensions for an between-size measurement or a different stitch gauge, use our crochet hat size calculator.
Master Sizing, Starting Chain & Row Count Chart (6 Sizes)
Every size below includes a 2-inch (5 cm) fold-up cuff and 1 to 1.5 inches of relaxed crown slouch.
Size | Head Circumference (CYC Standard) | Target Flat Rectangle Width (= Hat Height with Cuff) | Target Flat Rectangle Length (= Unstretched Circumference) | Option A: Bulky (#5) Starting Chain & Stitches | Option A: Bulky (#5) Total Rows | Option B: Worsted (#4) Starting Chain & Stitches | Option B: Worsted (#4) Total Rows | Est. Yardage (Bulky / Worsted) (estimate) |
|---|---|---|---|---|---|---|---|---|
Newborn | 13–14 in (33–35.5 cm) | 7.0 in (18 cm) | 11.5 in (29 cm) | Ch 20 → 18 dc | 18 rows | Ch 27 → 25 dc | 24 rows | 65 yd / 85 yd (estimate) |
Baby (3–6 mos) | 14–16 in (35.5–40.5 cm) | 8.0 in (20.5 cm) | 13.0 in (33 cm) | Ch 22 → 20 dc | 20 rows | Ch 30 → 28 dc | 28 rows | 80 yd / 105 yd (estimate) |
Toddler (1–3 yrs) | 16–18 in (40.5–46 cm) | 9.0 in (23 cm) | 15.0 in (38 cm) | Ch 25 → 23 dc | 24 rows | Ch 34 → 32 dc | 32 rows | 100 yd / 130 yd (estimate) |
Child (4–10 yrs) | 18–20 in (46–51 cm) | 10.0 in (25.5 cm) | 17.0 in (43 cm) | Ch 28 → 26 dc | 26 rows | Ch 38 → 36 dc | 36 rows | 125 yd / 160 yd (estimate) |
Adult Small / Med | 20.5–22 in (52–56 cm) | 11.0 in (28 cm) | 19.0 in (48 cm) | Ch 30 → 28 dc | 30 rows | Ch 41 → 39 dc | 40 rows | 155 yd / 195 yd (estimate) |
Adult Large | 22.5–23.5 in (57–60 cm) | 11.5 in (29 cm) | 20.5 in (52 cm) | Ch 32 → 30 dc | 32 rows | Ch 43 → 41 dc | 44 rows | 185 yd / 230 yd (estimate) |
Gauge Arithmetic Check
- Option A (Bulky #5 on 6.5 mm hook): Target gauge is 10 sts × 6.25 rows = 4 × 4 in (10 × 10 cm) in dc BLO (2.5 sts/in; 1.56 rows/in) (estimate).
- Adult S/M Width Math: $ ext{Ch } 30 - 2 = 28 ext{ dc}$. At $2.5 ext{ sts/in}$, $28 \div 2.5 = 11.2 ext{ in}$ total hat height.
- Adult S/M Circumference Math: $30 ext{ rows} \div 1.5625 ext{ rows/in} = 19.2 ext{ in}$ unstretched circumference (stretches comfortably to $21 ext{–}22 ext{ in}$).
- Option B (Worsted #4 on 5.5 mm hook): Target gauge is 14 sts × 8.5 rows = 4 × 4 in (10 × 10 cm) in dc BLO (3.5 sts/in; 2.125 rows/in) (estimate).
- Adult S/M Width Math: $ ext{Ch } 41 - 2 = 39 ext{ dc}$. At $3.5 ext{ sts/in}$, $39 \div 3.5 = 11.14 ext{ in}$ total hat height.
- Adult S/M Circumference Math: $40 ext{ rows} \div 2.125 ext{ rows/in} = 18.8 ext{ in}$ unstretched circumference (stretches comfortably to $21 ext{–}22 ext{ in}$).
Materials, Hooks & Stitches Used
Materials
- Yarn:
- Option A: CYC #5 Bulky weight acrylic, wool, or wool-blend yarn (100% wool or 80/20 wool-acrylic blend gives the best elastic recovery for ribbing).
- Option B: CYC #4 Worsted weight wool-blend or soft anti-pilling acrylic yarn.
- Crochet Hook:
- Option A: 6.5 mm (US K-10.5)
- Option B: 5.5 mm (US I-9)
- Notions: Tapestry needle (blunt jumbo eye for seaming and cinching), 2 locking stitch markers, scissors, tape measure, and an optional removable faux-fur or yarn pom-pom.
Stitches & Abbreviations (US Terms)
- ch: chain
- dc: double crochet (UK treble crochet —
tr) - dc BLO: double crochet in the back loop only (UK treble crochet in back loop only —
tr BLO) - sl st: slip stitch
- st(s): stitch(es)
- RS / WS: Right Side / Wrong Side
Complete Written Pattern: Step-by-Step Instructions
Pattern Notes & The "Both-Loops Border Rule"
- Turning Chain: The
ch 2at the beginning of each row does not count as a stitch. Always work the firstdcof the row into the very first stitch at the base of thech 2. - The Both-Loops Border Rule: On Row 2 and every row after, work the very first
dcand the very lastdcunder BOTH top loops, and work all stitches between them into the Back Loop Only (dc BLO). Working the two edge stitches under both loops prevents the crown edge from tearing when you cinch it tight and gives the folded brim a crisp, non-scalloped edge. - Even Row Count: Always finish on an even-numbered row so the starting tail and ending tail sit on opposite corners, making seaming and crown gathering cleaner.
Step 1: Crochet the Ribbed Rectangle
Foundation Chain:
- Leaving a 10-inch (25 cm) starting tail for seaming later, make a slip knot and chain the number listed in the chart for your chosen size and yarn weight:
- Option A (Bulky #5): Ch 20 (22, 25, 28, 30, 32).
- Option B (Worsted #4): Ch 27 (30, 34, 38, 41, 43).
Row 1 (Foundation Row — RS):
- Work
1 dcinto the 3rd chain from the hook (the skipped 2 chains do not count as a stitch). Place a locking stitch marker in the top V of this firstdc. - Work
1 dcinto each remaining chain across to the end. Place a second stitch marker in the finaldc. Turn. - Stitch Count:
- Option A (Bulky #5): 18 (20, 23, 26, 28, 30) dc
- Option B (Worsted #4): 25 (28, 32, 36, 39, 41) dc
Row 2 (Ribbing Row — WS):
Ch 2(does not count as a stitch).- Move the stitch marker up as you work
1 dcunder BOTH top loops of the very first stitch at the base of thech 2. - Work
1 dc BLO(inserting your hook under the back loop only—the loop farthest from you) into each stitch across until 1 stitch remains. - Work
1 dcunder BOTH top loops of the final marked stitch. Replace the marker in this last stitch. Turn. - Stitch Count: Same stitch count as Row 1 — 16 (18, 21, 24, 26, 28) dc BLO plus 2 border dc = 18 (20, 23, 26, 28, 30) total sts for Bulky; or 23 (26, 30, 34, 37, 39) dc BLO plus 2 border dc = 25 (28, 32, 36, 39, 41) total sts for Worsted.
Remaining Rows:
- Repeat Row 2 until you reach the total row count for your size:
- Option A (Bulky #5): Work until you have 18 (20, 24, 26, 30, 32) rows total.
- Option B (Worsted #4): Work until you have 24 (28, 32, 36, 40, 44) rows total.
- Fasten off after your final row, leaving a 24-inch (60 cm) long yarn tail for seaming the side of the hat and cinching the crown shut.
Step 2: Seam the Tube & Gather the Crown Without a Top Hole

1. Seam the Long Edges Into a Tube
- Fold the rectangle in half widthwise so the foundation chain edge meets the final row edge. Either side can serve as the Right Side, so fold with the Wrong Side facing out.
- Thread your 24-inch ending tail onto a tapestry needle (or use your crochet hook to work a slip-stitch seam).
- Working from the bottom brim edge up toward the top crown edge, whip-stitch or mattress-stitch through the inner loops only (matching each foundation chain stitch to the back loop of the corresponding stitch on the final row). This creates a flat, elastic vertical seam that blends right into the BLO ribs.
2. Cinch the Crown Shut
- Without cutting the yarn tail at the top of the seam, weave your tapestry needle in and out through every raised ridge end (every 2 rows) around the top perimeter of the tube—about 0.25 in (6 mm) below the raw edge.
- Pull the yarn tail firmly in one smooth motion until the top opening gathers into a tight starburst.
- Stitch across the center of the gathered hole in an "X" pattern (north-to-south, then east-to-west) to lock the center shut so no hole remains, even without a pom-pom.
- Turn the beanie Right Side out, weave in the remaining tails on the inside of the crown, and fold up a 2-inch (5 cm) ribbed cuff at the bottom.
3 Ways to Style & Customize Your Rectangle Beanie

Because the foundation chain controls the vertical height of the hat, you can create three distinct silhouettes from this exact pattern:
- Classic Fitted Cuffed Beanie (As Written): Fold up a 2-inch (5 cm) brim for a double-thick ear band and a gently rounded crown.
- Relaxed Unfolded Slouch Beanie: Wear the hat with the brim unfolded for an instant 2-inch slouch at the back of the crown.
- Extra-Slouchy Cuffed Beanie: Add 5 extra chains in Bulky (#5) or 7 extra chains in Worsted (#4) (about 2 extra inches of length) to your starting chain so you can fold up a 2-inch cuff and still keep a generous slouch at the crown.
Common Mistakes & Troubleshooting
1. The Brim Looks Stair-Stepped or Slanted When Folded Up
- Cause: Accidentally dropping or adding a stitch at the start or end of a row—usually by skipping the final stitch or failing to work into the very first stitch at the base of the
ch 2. - Fix: Keep locking stitch markers in Stitch #1 and the final stitch of every row, and always work those two edge stitches under both top loops.
2. The Crown Feels Too Thick and Bulky When Gathered
- Cause: Double crochet posts are thick; gathering 30 to 44 row ends into a single point in heavy yarn can create a dense knot at the crown.
- Fix (Tapered Crown Option): On the last 3 stitches of every row at the crown end of your rectangle, work
1 sc BLO(single crochet in the back loop only) instead ofdc BLO. Those 3 shorter stitches reduce the fabric bulk at the crown by half so it cinches completely flat.
Frequently Asked Questions
Can I make this beanie with Front Post / Back Post ribbing instead of BLO dc?
Working an entire flat rectangle sideways in Front Post and Back Post double crochet (FPdc/BPdc) creates a very thick, heavy fabric that does not gather smoothly at the crown. Instead, if you want a post-stitch brim, work a top-down hat in the round and finish the bottom edge with FPdc/BPdc ribbing.
How do I wash a crochet beanie that has a faux-fur pom-pom?
Always use a removable pom-pom with a snap fastener or long tie strings threaded through the inside of the crown. Untie or unsnap the faux-fur pom-pom before hand-washing or machine-washing the beanie in cold water on a gentle cycle, then lay the hat flat to dry before reattaching the pom-pom.
Which side of the rectangle is the Right Side (RS)?
Because you turn your work at the end of every row, dc BLO fabric is completely reversible—both sides show identical vertical ribs. Once you seam the tube, simply turn the hat so the seamed edge sits on the inside.
Why did my hat stretch out after wearing it a few times?
100% acrylic and superwash merino yarns have less natural memory than non-superwash wool blends. If you crochet loosely with soft acrylic yarn, subtract an extra 0.5 in (2 rows) from the rectangle length or weave thin elastic thread through the inside of the brim fold.



Questions & notes
No comments yet
Sign in or create a free account to comment under your profile and keep track of your replies.
Your email address is never published. Comments are moderated under our Community Guidelines; see our Privacy Policy for how we use your details.