How to Make a Magic Ring (Magic Circle) in Crochet
A magic ring starts a round with an adjustable loop you pull tight, leaving no hole in the centre. Here is how to make one, including with double crochet.

10 min read

By Double Crochet Editorial Team | Last Updated: November 2026
A magic ring (also called a magic circle or adjustable ring) is a way to start crocheting in the round by working your first round of stitches over an adjustable yarn loop and then pulling the yarn tail tight. Unlike a traditional chain-ring start, a magic ring cinches completely shut with zero hole in the center—making it essential for amigurumi toys (so stuffing never shows through), top-down beanies, coasters, and granny squares.
US vs. UK Terminology Note: This tutorial uses US crochet terms. A US single crochet (sc) is called a double crochet (dc) in UK patterns, a US half double crochet (hdc) is a UK half treble (htr), and a US double crochet (dc) is a UK treble (tr). Note that "magic loop" in knitting refers to a circular needle technique, whereas in crochet magic ring, magic circle, and magic loop all mean the exact same adjustable starting ring.
Step-by-Step: How to Make a Magic Ring
The secret to a magic ring that slides shut effortlessly is making sure your Round 1 stitches wrap around both strands at the bottom of the loop: the circular ring strand and the cut yarn tail.
Step 1: Wrap the Yarn to Form an X Across Two Fingers
- Hold the cut yarn tail (
15 cm/6 inlong) against the palm of your non-hook hand (left hand for right-handed crocheters) using your thumb and ring finger. - Wrap the working yarn (attached to the ball) loosely around your index and middle fingers twice so the two strands cross in an
Xon the top side of your fingers. - Pinch the intersection of the
Xgently with your thumb so the loop stays open and does not tighten.

Step 2: Pull Up a Loop and Lock the Ring (ch 1)
- Hold your crochet hook in your dominant hand with the hook lip facing down.
- Slide the hook tip underneath the right-hand strand (the front loop closest to your fingertips) and over the left-hand strand (the working yarn closest to your knuckles).
- Hook that left-hand working yarn strand, pull it under the front strand, and rotate your hook upward so a single loop sits on your hook shaft.
- Yarn over with the working yarn and pull through the loop on your hook to make 1 chain (
ch 1).- Crucial Rule: This initial
ch 1only locks the adjustable ring together so you can slip it off your fingers—it does not count as a stitch when working single crochet.
- Crucial Rule: This initial
Step 3: Work Round 1 Over BOTH the Ring and the Yarn Tail
- Gently slide the open yarn ring off your fingers and hold the bottom of the ring where the main loop strand and the cut yarn tail run parallel to each other.
- Insert your hook through the center of the large ring from front to back, making sure the hook goes underneath both strands (the ring loop + the yarn tail).
- Work your required Round 1 stitches into the center of the ring over both strands.

Step 4: Pull the Yarn Tail to Close the Center Hole
- Once all Round 1 stitches are on the ring, hold the tops of your stitches gently between your thumb and index finger so they don't twist.
- With your other hand, grab the cut yarn tail (not the working yarn) and pull it firmly. The adjustable loop will slide through the bases of your stitches, drawing the first and last stitch together until the center hole disappears completely.
Left-Handed Crocheter Note: Left-handed crocheters follow the exact same mechanics in mirror image: wrap the yarn around your right index and middle fingers with the cut tail hanging down on the right and the working yarn on the left. Slide your hook under the front strand, grab the working yarn, lock with a ch 1, and work your Round 1 stitches clockwise around the ring over both the loop and the yarn tail.Starting Stitch Counts in a Magic Ring (sc, hdc, and dc)
How many chains you make to lock the ring—and how many stitches you put inside the magic ring on Round 1—depends on the height of your stitch so the circle lies completely flat without ruffling or cupping into a bowl:
Stitch Type (US / UK) | Starting Chain After Forming Ring | Does Starting Chain Count as Stitch #1? | Standard Round 1 Stitch Count for a Flat Circle | How Round 1 Ends |
|---|---|---|---|---|
Single Crochet ( |
| No (never counts) | 6 | Continuous spiral (work Rnd 2 directly into 1st |
Half Double Crochet ( |
| Usually No (check pattern) | 8 to 10 |
|
Double Crochet ( |
| No if | 10 to 12 |
|
Single Crochet (sc) in a Magic Ring (Amigurumi Standard)
For an amigurumi ball or stuffed toy worked in continuous spiral rounds:
- Round 1 Math: Make a magic ring,
ch 1(does not count as a stitch). Work6 scinto the ring over both strands. Pull the yarn tail tight (6 sts). - Starting Round 2: Do not slip stitch to join. Insert your hook directly under both top
Vloops of the 1stscof Round 1, work2 scin that stitch, clip a locking stitch marker into the first of those two stitches, and work2 scin each remaining stitch around (6 × 2 = 12 sc).
Double Crochet (dc) in a Magic Ring (Coasters, Hats, and Blankets)
Because double crochet is roughly three times taller than single crochet, it needs 10 to 12 stitches in Round 1 to span the circumference of a flat circle (such as a round coaster):
- Method A — Uncounted
ch 2(Cleanest Seam):- Make a magic ring and
ch 2(does not count as a stitch). - Work
12 dcinto the center of the ring over both the ring loop and the yarn tail. - Pull the yarn tail tight to close the center, then join with a
sl stinto the topVof the 1st realdc(skipping thech 2). Round 1 total = 12dc.
- Make a magic ring and
- Method B — Counted
ch 3(Traditional Pattern Standard):- Make a magic ring and
ch 3(counts as Stitch #1). - Work
11 dcinto the center of the ring over both strands (1countedch 3+11 dc= 12 stitches total). - Pull the yarn tail tight, then join with a
sl stinto the 3rd chain of the startingch 3.
- Make a magic ring and
Continuing to Round 2 and beyond? Once your magic ring is closed, follow our step-by-step guide to double crochet in the round or plug your stitch count into the flat circle calculator to get exact increase math for any round.
How to Make a Double-Loop Magic Ring (Extra Secure)
If you are making a baby blanket, throw, tote bag, or wearable garment out of granny squares that will go through the washing machine repeatedly, use a double-loop magic ring. Wrapping the loop twice doubles the friction inside the bases of your stitches so the center cannot slip open under tension.
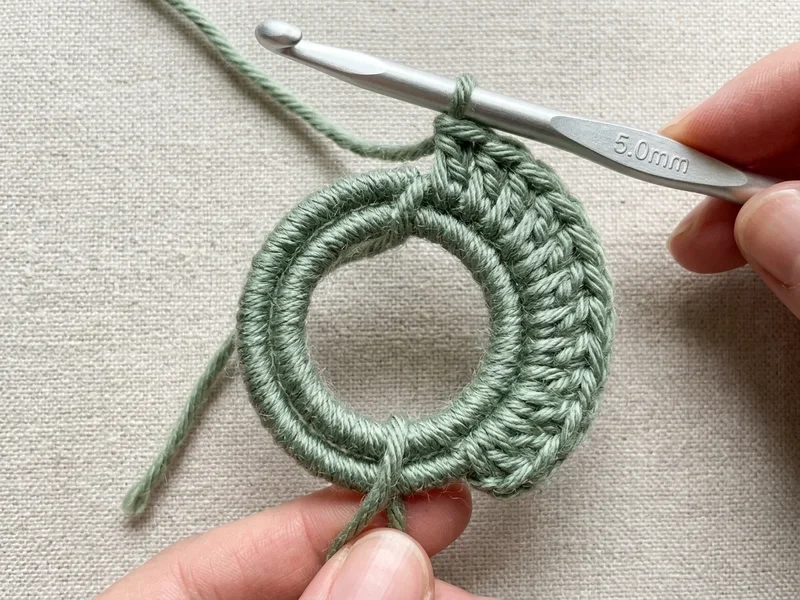
- Wrap three times around your fingers: Hold the tail against your palm and wrap the working yarn around your index and middle fingers so you see two full parallel loops plus the crossed
Xon top. - Pull up your loop and lock with
ch 1(orch 2/ch 3): Slide your hook under both front loops, hook the working yarn from the back, pull up a loop, and chain to lock. - Work Round 1 over all three strands: Crochet your Round 1 stitches around both circular ring loops AND the cut yarn tail (3 strands total at the bottom of the ring).
- Close the two loops one at a time:
- Gently tug the yarn tail about
1 cm(0.5 in) just to see which of the two circular loops starts shrinking first. - Grab the back side of that moving loop and pull it tightly until the second loop closes completely.
- Finally, pull the cut yarn tail all the way out to cinch the first loop shut!
- Gently tug the yarn tail about
How to Keep a Magic Ring Closed Forever
The #1 beginner mistake with a magic ring is pulling the center closed and snipping the yarn tail right away—which guarantees the center will unravel the first time the piece is stretched or washed!
Because a magic ring does not start with a knotted slip knot, weaving in the tail is what locks the ring:
- Thread the
15 cm(6 in) center yarn tail onto a blunt metal tapestry needle on the wrong side (back) of your work. - Direction 1 (Follow the circle): Run the needle under the base loops of
4to5stitches around the center ring in the same direction you tightened the tail, and pull snug. - Direction 2 (Reverse direction): Skip over one strand to prevent unthreading, then weave the needle backward in the opposite direction through
4to5stitches around the center ring. - Direction 3 (Locking pass): Turn one more time and run through
2to3adjacent stitch posts before trimming the yarn flush. Reversing direction at least twice creates a mechanical lock that cannot pull open.
Chain-Ring Alternative: When Not to Use a Magic Ring
There are two situations where a traditional chain ring is better than a magic ring:
- Super-bulky plush chenille or velvet yarn (
#6): High-pile chenille yarn creates so much friction inside a magic ring that pulling the tail often snaps the inner thread core right off. - Open-center lacy motifs: When a mandala or vintage granny square is designed to have a decorative center eyelet.

Alternative Method | Best For | How to Work Round 1 |
|---|---|---|
The | Amigurumi & plush chenille yarn ( | Make a slip knot, |
The | Double crochet ( | Make a slip knot, |
Frequently Asked Questions (FAQ)
Does the chain 1 in a magic ring count as a stitch?
No. When working single crochet (sc) into a magic ring, the initial ch 1 you make right after pulling up your first loop only locks the adjustable ring in place so it doesn't unravel when you take it off your fingers. Do not count that ch 1 as a stitch, and do not work into it at the end of Round 1.
Why won't my magic ring pull closed when I pull the tail?
A magic ring refuses to cinch shut for one of three reasons:
- You worked over only one strand: Your Round 1 stitches must wrap around both the circular ring strand and the cut yarn tail. If the yarn tail was left hanging outside your stitches, pulling it won't move the ring.
- The ring twisted into a slip knot first: If you pulled the
ch 1lock so tight that it flipped into a slip knot around the tail before you worked your stitches, the knot will jam. - You are using high-friction chenille yarn: Plush velvet or chenille yarn grips itself when pulled. Pull gently in short
1 cmincrements while sliding the stitches with your fingers, or use thech 2method instead.
How do I convert a pattern from a chain ring to a magic ring?
If a pattern starts with "Ch 4, join with sl st to first ch to form a ring, ch 3, work 11 dc into ring", simply replace "Ch 4, join with sl st to form a ring" with "Make a magic ring". Then work the exact same starting chain (ch 3) and the exact same number of stitches (11 dc) into the magic ring, pull the tail closed, and join with a sl st.
Can you use a magic ring for granny squares and blankets?
Yes—a magic ring gives granny squares a crisp, hole-free center. However, because blankets are heavy and go through the laundry, always use either a double-loop magic ring or leave a full 15 cm (6 in) tail and weave it in three opposing directions around the center ring with a tapestry needle so the center never opens over time.


Questions & notes
No comments yet
Sign in or create a free account to comment under your profile and keep track of your replies.
Your email address is never published. Comments are moderated under our Community Guidelines; see our Privacy Policy for how we use your details.