How to Hold a Crochet Hook and Yarn (Pencil Grip, Knife Grip, and Tension)
There are two common ways to hold a crochet hook, and both work. Here is how each one feels, how to hold the yarn, and how to keep your tension even.

10 min read

By Double Crochet Editorial Team | Last Updated: November 2026
There are two standard ways to hold a crochet hook—the pencil grip and the knife grip—and neither one is wrong. Your dominant hand holds the crochet hook to form loops, while your non-dominant hand does two jobs at once: weaving the working yarn through your fingers to control tension and pinching the crochet fabric right below the active stitch with your thumb and middle finger.
US vs. UK Terminology Note: Hand grips, hook anatomy, and yarn-tension wraps work identically whether you follow US or UK crochet patterns. When we mention basic stitches below, remember that a US single crochet (sc) is called a double crochet (dc) in the UK, and a US double crochet (dc) is called a treble (tr) in the UK.
Part 1: How to Hold a Crochet Hook (Pencil Grip vs. Knife Grip)
Before you make a slip knot, pick up your crochet hook with your dominant hand (right hand for right-handed crocheters; left hand for left-handed crocheters). Every crochet hook has a flat thumb rest (or contoured grip zone) about 4 cm (1.5 in) behind the hook tip. Both standard grips place your thumb and index finger right on that thumb rest—the only difference is whether the handle passes above or below your palm.

1. The Pencil Grip (Underhand Hold)
In the pencil grip, you hold the crochet hook from underneath, just like holding a pencil or chopsticks:
- Pinch the flat thumb rest of the hook between the pad of your thumb and the side of your index finger.
- Let the underside of the hook rest against the top joint of your middle finger for support.
- Let the back end of the hook shaft rest on top of the web between your thumb and index finger, pointing upward past your knuckles.
- How it moves: Your wrist stays mostly still while your thumb, index, and middle fingers make small, precise twirling motions to dip the hook into stitches.
2. The Knife Grip (Overhand Hold)
In the knife grip, you hold the crochet hook from above, just like holding a steak knife to cut food on a plate:
- Lay the back end of the hook handle underneath your palm so the end of the hook points toward the base of your wrist.
- Place your thumb flat against the side of the thumb rest and extend your index finger along the top of the hook shaft toward the tip (or curl it gently around the handle).
- Curl your middle, ring, and little fingers loosely around the underside of the handle.
- How it moves: Your fingers stay relaxed against the handle while your wrist and forearm rotate smoothly as a single unit.
Comparison Table: Pencil Grip vs. Knife Grip
Feature | Pencil Grip (Underhand) | Knife Grip (Overhand) |
|---|---|---|
Handle Position | Rests above the hand (on the web between thumb and index finger) | Tucks underneath the palm |
Primary Muscle Motion | Fine finger flexion (thumb, index, and middle fingers) | Whole-hand and gentle wrist rotation |
Best Project Types | Fine lacework, crochet thread, and intricate stitch placement | Amigurumi, thick blankets, cotton dishcloths, and bulky yarns |
Best Hook Handle Shape | Straight bare metal hooks or slim tapered handles | Contoured ergonomic rubber handles or rounded wooden handles |
Main Ergonomic Risk | Pinch fatigue in the thumb and index finger if gripped too tightly | Wrist stiffness if you lock your wrist instead of rotating smoothly |
Which grip is faster? Neither grip is inherently faster for everyone—speed comes from minimizing wasted hand motion. Once your hands feel comfortable, read our guide on how grip affects speed in double crochet.
Part 2: How to Hold the Yarn (3 Finger-Wrap Tension Methods)
While your dominant hand works the hook, your non-dominant hand acts as the yarn feeder and tension brake.
Think of your non-dominant fingers as having three distinct jobs:
- Your Pinky and Ring Fingers = The Brake: They create gentle friction on the yarn coming from the ball so it doesn't unspool all at once.
- Your Index (Pointer) Finger = The Tension Arm: The working yarn always drapes over the top of your index finger, which lifts slightly to take up slack or bends slightly to feed yarn to the hook.
- Your Thumb and Middle Finger = The Clamp: They stay free to pinch the crochet fabric right below your hook.
Never wrap yarn in a full loop around your index finger! Wrapping yarn tightly around your index finger cuts off circulation and forces you to stop every 3 stitches to unroll more yarn. Instead, weave the yarn through your lower fingers so it glides continuously over your index finger.

Wrap 1: The Pinky-Loop Wrap (Best for Slippery or Fine Yarn)
If your yarn keeps falling off your hand or feels too loose (common with mercerized cotton, bamboo, silk, or lightweight #2/#3 yarns), use the pinky loop to add gentle braking friction:
- With your palm facing you, bring the working yarn from the ball up between your pinky and ring fingers, and wrap it all the way around your pinky finger once.
- Lead the yarn across the back (knuckle side) of your ring and middle fingers—or across the palm side of your ring and middle fingers.
- Bring the yarn forward between your middle and index fingers and drape it over the top of your index finger (from back to front).
Wrap 2: The Simple Two-Finger Weave (Best for Worsted & Bulky Yarn)
If the pinky loop feels too tight or causes fuzzy/chunky #4–#6 yarn to drag and squeak, skip the full loop and use a simple weave:
- With the back of your hand facing you, lay the working yarn under your pinky and ring fingers.
- Bring the yarn up and over your middle finger (or under your middle finger) and drape it over the top of your extended index finger.
- Gently close your pinky and ring fingers toward your palm whenever you need a tiny bit more tension, and relax them to let yarn glide through.
Wrap 3: The Over-Index-Only Hold (Easiest for Absolute Beginners)
If coordinating four fingers feels overwhelming on Day 1:
- Lay the working yarn across your open palm from the bottom of your hand up toward your index finger.
- Drape the yarn over the top of your index finger from back to front.
- Gently curl your pinky and ring fingers down against your palm to trap the yarn lightly against your skin.
Part 3: How to Hold the Work (The Thumb-and-Middle-Finger Pinch)
The most overlooked secret in beginner crochet is what your non-hook thumb and middle finger are doing. If you let your foundation chain or swatch dangle in mid-air 10 cm (4 in) below your hook, you will struggle to push the hook through stitches and your tension will swing wildly.
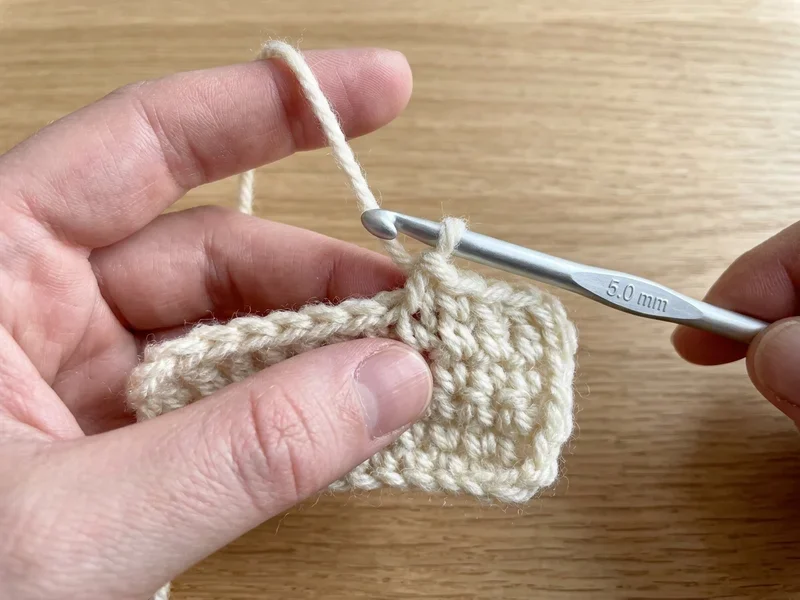
Follow the 1-Inch Pinch Rule:
- While your non-dominant index finger holds the working yarn taut about
2.5 cm(1 in) above the hook, bring your thumb and middle finger together to pinch the crochet fabric directly underneath the stitch you are currently working into. - Every
2to3stitches across a row, shift your thumb and middle finger to the left so they are always pinching right below the active loop on your hook. - On a foundation chain, pinch the chain
1or2links below the hook; on Row 1 and beyond, pinch the body of the row below. This anchors the stitch so the hook glides in and out with zero tugging.
Part 4: Finding Even Tension (The Hook Shaft vs. Throat Rule)
Good tension does not come from pulling the yarn as tight as you can—it comes from letting the crochet hook shaft measure every loop for you.
- Let every loop slide onto the cylindrical shaft: The tapered throat just behind the hook lip is narrower than the hook's stated millimeter size. Whenever you pull up a loop, let it slide back onto the parallel shaft (just in front of the flat thumb rest) so the loop opens to the full
5.0 mm(or your hook's exact gauge diameter). - Never tug the working yarn after finishing a stitch: Tightening the yarn after completing a stitch strangles the top
V, making the next row painful to work into. - Check your index-finger span: The strand of working yarn stretching between your index finger and the hook should be straight and lightly taut—never sagging in a loose loop, and never pulled so hard that it leaves a deep white groove across your knuckle.
Left-Handed Crochet: Mirroring the Setup
If you are left-handed, you do not need to force yourself to crochet right-handed:
- Left Hand = Hook Hand: Hold the crochet hook in your left hand using either the pencil grip or the knife grip.
- Right Hand = Yarn & Work Hand: Weave the working yarn through the fingers of your right hand so it drapes over your right index finger, and pinch the fabric right below the hook with your right thumb and middle finger.
- Direction of Work: While right-handed crocheters work flat rows from right to left (
←), left-handed crocheters naturally work flat rows from left to right (→) and work in the round clockwise. For full mirror-image stitch diagrams and pattern reading tips, visit our guide to left-handed crochet.
Comfort, Ergonomics, and Preventing Hand Pain
If your fingers cramp or your wrist aches after 15 minutes of practice, your hands are working too hard. Make these three adjustments right away:

- Drop the "Death Grip": Beginners subconsciously squeeze the flat metal thumb rest until their knuckles turn white. Every time you finish a row, set the hook down for 5 seconds, shake out your fingers, and pick the hook back up with just enough pressure to keep it from dropping.
- Switch to an ergonomic handle (
12–15 mmdiameter): Standard bare aluminum hooks are very thin (4–6 mmthick), forcing your palm and thumb to pinch tightly. Sliding a padded elastomer handle—or switching to an ergonomic soft-grip or contoured wooden hook—fills your palm naturally and reduces pinch force dramatically. - Pace your practice sessions: Short, relaxed 20-minute sessions build muscle memory much faster than a 2-hour marathon with sore hands. Use our interactive ergonomic session planner to schedule healthy stretch breaks based on your grip style and yarn weight.
Frequently Asked Questions (FAQ)
Is it better to hold a crochet hook like a pencil or a knife?
Neither grip is better—both produce the exact same stitches, and professional crocheters are split roughly evenly between the two. The knife grip (overhand) distributes pressure across your whole palm and gives more leverage for amigurumi and medium-to-bulky yarns, while the pencil grip (underhand) uses fine finger movements that many crocheters love for lightweight yarn and lace. Try both for 15 minutes and use whichever keeps your wrist and fingers most relaxed.
Which hand holds the yarn in crochet?
Your non-dominant hand holds and tensions the working yarn, while your dominant hand holds the crochet hook. If you are right-handed, hold the hook in your right hand and weave the yarn through your left hand; if you are left-handed, hold the hook in your left hand and weave the yarn through your right hand.
How do I stop the yarn from slipping off my finger when crocheting?
If the working yarn keeps sliding off your index finger and losing tension, add one extra point of gentle friction on your lower fingers: wrap the yarn once around your pinky finger before bringing it across your ring and middle fingers and over your index finger, or gently close your pinky and ring fingers toward your palm to act as a brake.
Can you hold the yarn in the same hand as the crochet hook?
Some knitters who learned "English-style" (throwing) knitting try to let go of the crochet hook to wrap the yarn with their right hand on every stitch. While possible, "throwing" yarn with your hook hand is much slower and causes uneven stitch tension. Training your non-dominant hand to hold the yarn taut over your index finger while your thumb and middle finger pinch the work makes crocheting twice as smooth and effortless once the muscle memory clicks (usually after 2 to 3 practice swatches).


Questions & notes
No comments yet
Sign in or create a free account to comment under your profile and keep track of your replies.
Your email address is never published. Comments are moderated under our Community Guidelines; see our Privacy Policy for how we use your details.